ASP.NET Core 9 introduces support for Pushed Authorization Requests (PAR) in its OpenIdConnect authentication handler. But what exactly is PAR, and why does it matter? In this post, I’ll explain what PAR is, how it works, how to use it with Duende IdentityServer, and when you should consider using it in your applications.

What is Pushed Authorization Requests (PAR)?
PAR is a relatively new OAuth standard that is designed to enhance the security of OAuth and OpenID Connect (OIDC) flows. Traditionally, authorization parameters (such as client credentials, scopes, and redirect URIs) are passed through the browser (front channel) via URL query strings. This approach exposes sensitive data to potential attackers and increases the risk of tampering. PAR addresses this by shifting the transmission of authorization parameters from the front channel to the back channel through direct machine-to-machine HTTP calls.
This change brings several important benefits:
- Improved Security: Since authorization parameters are sent via a secure back-channel request, they are no longer exposed in browser URLs, reducing the risk of sensitive information (like Personally Identifiable Information, or PII) being leaked.
- Tamper Resistance: By pushing authorization requests through the back end, attackers are prevented from modifying the parameters, such as the requested scopes or access levels.
- Shorter URLs: In complex OAuth/OIDC scenarios (such as when using Rich Authorization Requests, URLs can become excessively long, which can cause issues with some browsers and networking systems.
Why are Pushed Authorization Requests Important?
PAR has gained a lot of traction in industries with stringent security requirements, such as open banking and healthcare. The FAPI 2.0 Security Profile, which is developed by the Financial-grade API (FAPI) working group within the OpenID Foundation, now mandates the use of PAR for increased security.
As a result, many identity providers, including Duende IdentityServer, Curity, Keycloak, and Authlete, now support PAR.
Authenticating without Pushed Authorization Requests (PAR)
When you’re using the Authorization Code flow to authenticate with an authorization server without using PAR, the process typically follows this sequence:
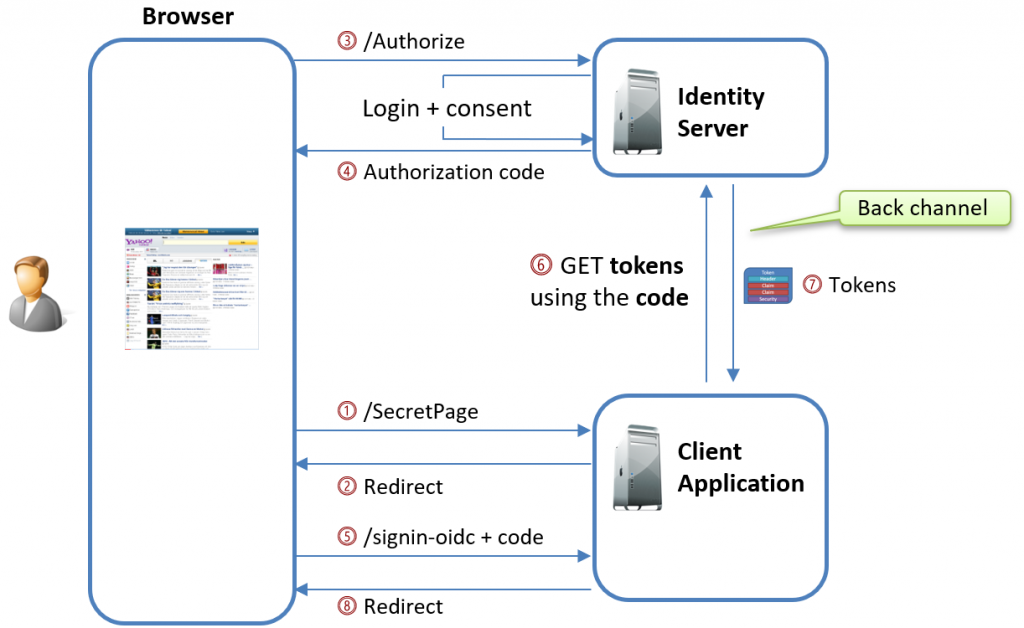
Initial Request to the Authorization Endpoint
When a user needs to authenticate, the OpenID Connect handler in the client initiates the authentication flow by redirecting the user to the authorization endpoint. This request includes all of the necessary authorization parameters, which are sent through the browser’s front channel via the URL, as shown below:
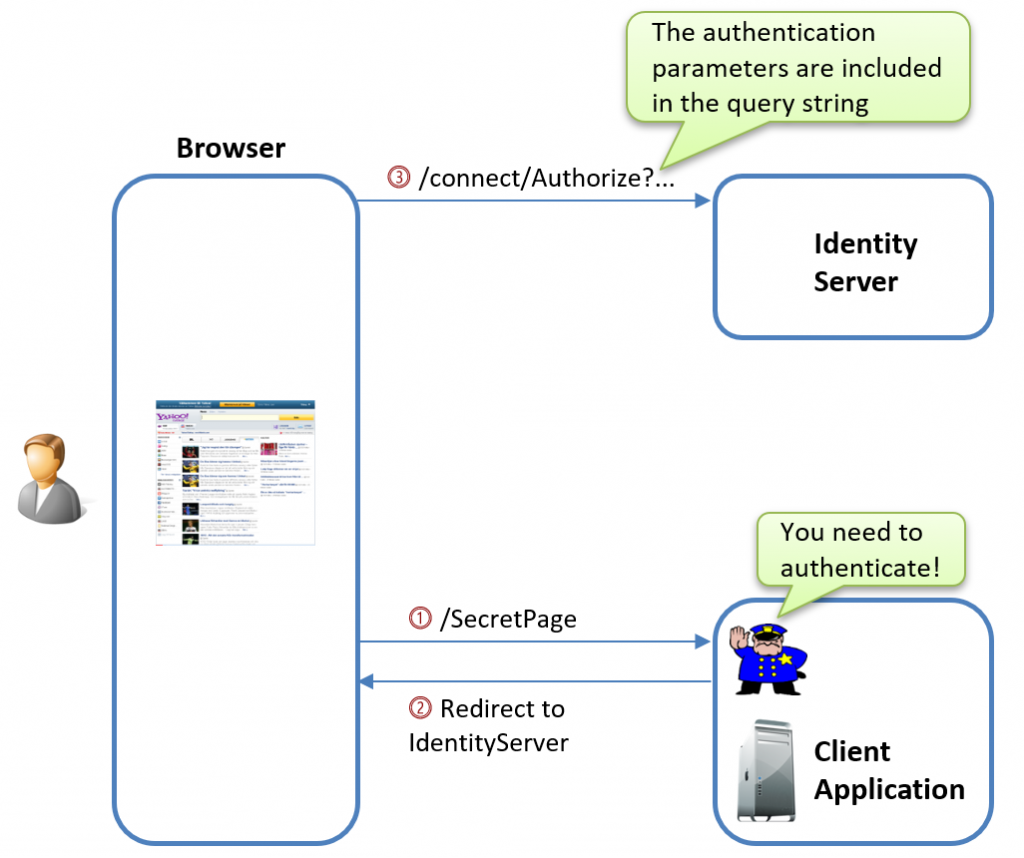
Here’s a sample request:
					GET https://myidentityserver.com/connect/authorize
?client_id=myclient
&redirect_uri=https%3A%2F%2Flocalhost%3A5001%2Fsignin-oidc
&response_type=code
&scope=openid%20profile%20email%20offline_access
&code_challenge=mmTnrL97RIKECAhsDKXP0lXubokXxr5tPqq_fOP2rtg
&code_challenge_method=S256
&response_mode=form_post
&nonce=638645055062345714....
&state=CfDJ8IgPXRNAZH1EkNA0dd....
&x-client-SKU=ID_NET9_0
&x-client-ver=8.1.2.0 HTTP/1.1
See my blog post Demystifying OpenID Connect’s State and Nonce Parameters in ASP.NET Core for more details about what the state and nonce contains.
Receiving the Authorization Code
After the user authenticates and consents to the request, the authorization server sends the application an authorization code.

This code is delivered to the redirect_uri (in this example, https://localhost:5001/signin-oidc) through a POST request:
					POST https://localhost:5001/signin-oidc HTTP/1.1
Content-Type: application/x-www-form-urlencoded

code=7C6DA4BE86ED80FD9DB9A077320C2DF0FC2B1CD43D742C5CFDD466FF5B850188-1
&scope=openid+profile+email+offline_access
&state=CfDJ8IgPXRNAZH1EkNA0dd3_JvtZYeDos8gQO0om...
&session_state=vXoggS4g5yYhV8pQNnZ5eq5DLC4UKE2Pq4ggWPNEOX8...
&iss=https%3A%2F%2Fmyidentityserver.com
This request also includes the state parameter to ensure the response matches the original request.
Exchanging the Authorization Code for Tokens
Once the client application receives the authorization code, it can exchange it for tokens by making a request to the token endpoint over the back channel.
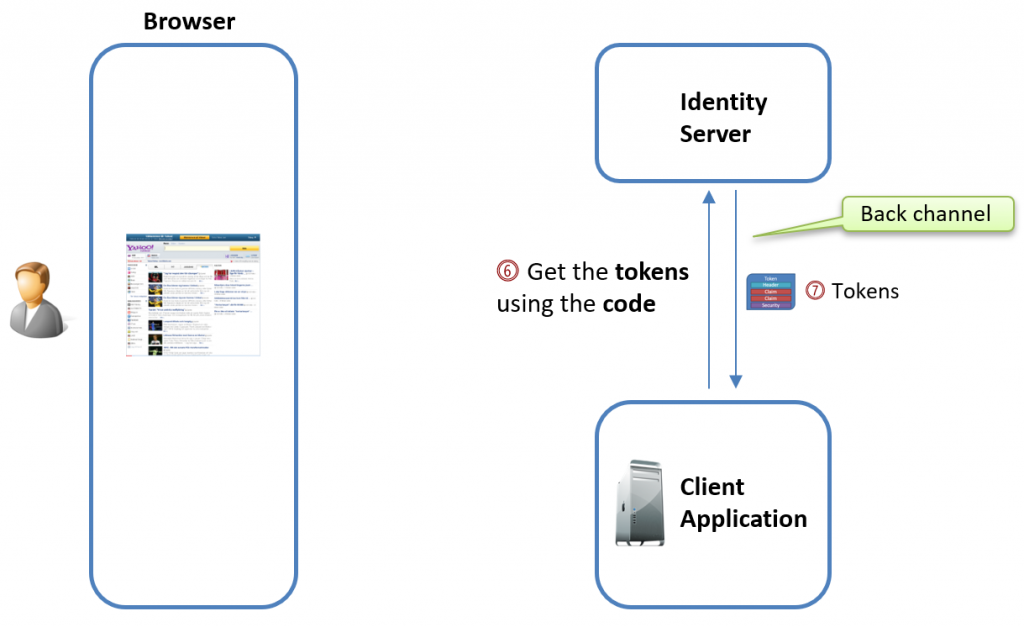
Here’s an example of that request:
					POST https://myidentityserver.com/connect/token HTTP/1.1
Content-Type: application/x-www-form-urlencoded

client_id=myclient
&client_secret=mysecret
&code=7C6DA4BE86ED80FD9DB9A077320C2DF0FC2B1CD43D742C5CFDD466FF5B850188-1
&grant_type=authorization_code
&redirect_uri=https%3A%2F%2Flocalhost%3A5001%2Fsignin-oidc
&code_verifier=ZQVkrVGSqxYPrPyO1Bjppnd-Kv3rH3LX_8U3Q7ScB5I
If the authorization code exchange is successful, the authorization server responds with the requested tokens:
					HTTP/1.1 200 OK
Content-Type: application/json; charset=UTF-8

{
  "id_token":"eyJhbGciOiJSUzI1NiIsImt...",
  "access_token":"eyJhbGciOiJSUzI1NiIsImtpZ...",
  "expires_in":3600,
  "token_type":"Bearer",
  "refresh_token":"CAB1E2AC3A9904AF307F8B7...",
  "scope":"openid profile email offline_access"
}
This flow follows the typical OAuth Authorization Code flow without using PAR. While this approach works well, sending sensitive parameters via the front channel (browser URL) can expose them to potential tampering or leakage. That’s where PAR comes in; instead, it shifts these parameters to a more secure back-channel communication.
Pushed Authorization Requests (PAR) metadata
According to RFC 9126, the discovery document of an identity provider includes new fields related to Pushed Authorization Requests (PAR). These fields help clients to determine if and how to use PAR during user authentications. The relevant new metadata fields are:
- pushed_authorization_request_endpoint
The endpoint where the client sends the PAR request.
- require_pushed_authorization_requests
A boolean parameter that indicates whether the authorization server only accepts authorization requests via PAR. If omitted, the default value is false
For example, in the discovery document from IdentityServer located at /.well-known/openid-configuration, you might see the following metadata:
					{
  ...
  "pushed_authorization_request_endpoint": "https://myidentityserver.com/connect/par",
  "require_pushed_authorization_requests": false,
  ...
}
When a client starts up, it typically downloads this discovery document. By reading these fields, the client can decide whether to use PAR for the authorization request. If require_pushed_authorization_requests is true, then the client must use PAR; otherwise, it can use the standard front-channel authorization request approach.
Configuring Pushed Authorization Requests in IdentityServer
IdentityServer is one of several authorization servers that support PARs. You can configure and control PAR in two key areas: globally during server startup and at the client level in the client definitions.
- Global Configuration at Startup
When setting up the server, you can enable and configure PAR globally in IdentityServer by modifying the IdentityServerOptions. Here’s how you can do it:
					builder.Services.AddIdentityServer(options =>
{
    ...
    options.Endpoints.EnablePushedAuthorizationEndpoint = true;

    options.PushedAuthorization = new PushedAuthorizationOptions
    {
        // Specifies whether pushed authorization requests are globally required
        // (Default false).
        Required = true,

        // The pushed authorization request's lifetime (Default 10 minutes)
        Lifetime = 10 * 60,

        // Specifies whether clients may use redirect URIs that were not previously
        // (default false)
        AllowUnregisteredPushedRedirectUris = true,
    };
});
- Client-Specific Configuration
In addition to global settings, you can configure PAR behavior in the client definitions. This allows you to enforce or adjust PAR usage for specific clients as needed.
					new Client
{
    ...
    RequirePushedAuthorization = true,
    PushedAuthorizationLifetime = 10*60, // 10 minutes
}
Configuring Pushed Authorization Requests in ASP.NET Core 9
ASP.NET Core 9 introduces Pushed Authorization Requests (PAR) support in its OpenID Connect authentication handler. You can manage how PAR is used using the new PushedAuthorizationBehavior option.
Here’s an example of how to configure it:
					.AddMyOpenIdConnect(options =>
{
    options.Authority = "https://myidentityserver.com";

    options.PushedAuthorizationBehavior = PushedAuthorizationBehavior.Disable;
    ...
});
The PushedAuthorizationBehavior option also determines whether and when PAR should be used during the authorization process. This option accepts an enum with the following values:
					public enum PushedAuthorizationBehavior
 {
    /// <summary>
    /// Use Pushed Authorization (PAR) if the PAR endpoint is available.
    /// This is the default value.
    /// </summary>
    UseIfAvailable,
    /// <summary>
    /// Never use Pushed Authorization (PAR), even if the PAR endpoint is available
    /// </summary>
    Disable,
    /// <summary>
    /// Always use Pushed Authorization (PAR), and emit errors if there is no PAR endpoint
    /// </summary>
    Require
 }
By adjusting this option, you can fine-tune how your application handles authorization requests, enabling both strong security and compatibility with identity providers.
In the next section, we’ll explore how PAR requests work in action.
Pushed Authorization Requests in Action
The authorization process involves multiple steps when you’re using Pushed Authorization Requests (PAR), starting with the initial request that pushes the authorization parameters to the authorization server.
First Request – The Pushed Authorization Request
First, the ASP.NET Core OpenIdConnect handler sends a POST request to the identity provider’s PAR endpoint with the authentication details:
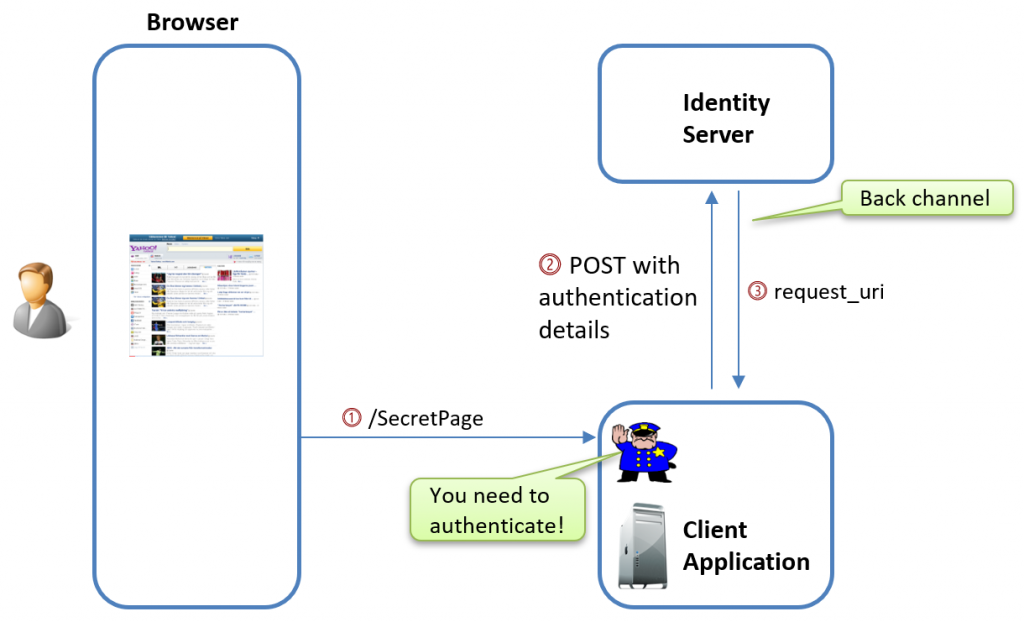
Here’s an example of what that request looks like:
					POST https://myidentityserver.com/connect/par HTTP/1.1
User-Agent: Microsoft ASP.NET Core OpenIdConnect handler
Content-Type: application/x-www-form-urlencoded

client_id=localhost-addoidc-client-PAR
&redirect_uri=https%3A%2F%2Flocalhost%3A5001%2Fsignin-oidc
&response_type=code
&scope=openid+profile+email+offline_access
&code_challenge=ZBSpp9z-eMxb3uFOyl8lMLIW7TGERoprxvBH8wMQ444
&code_challenge_method=S256
&response_mode=form_post
&nonce=638645126122011768.MGI2YTg4MmItODA0Ni00NzY2LW...
&state=CfDJ8IgPXRNAZH1EkNA0dd3_JvuMKE37whAZ6E15FtjzZ...
&client_secret=mysecret
This request closely mirrors the parameters used in the traditional (non-PAR) flow, with one key difference: instead of sending the parameters in the URL, they are sent directly from the client in the POST request body.
By pushing the parameters in the body of a POST request, PAR provides several advantages:
- Larger Payload:
Unlike URLs, which are limited in length, the body of a POST request can carry a larger payload, making it ideal for more complex authorization requests. - Improved Security:
Since the request parameters, including sensitive data (such as client_secret and code_challenge), are placed in the body rather than the URL, this information is less likely to be logged or exposed. This helps to mitigate the risk of leaking secrets through URL logs or browser history.
The response to this POST request typically looks like this:
					HTTP/1.1 201 Created
Content-Type: application/json; charset=UTF-8

{
  "request_uri":
"urn:ietf:params:oauth:request_uri:ED3A57A0CC571379715FBE0C0B62DEF84D903A96B8E1A1D43EDC1D757C828050",
  "expires_in":600
}
In this response:
- request_uri:
A unique identifier (or token) that represents the authorization request. This URI will be used in the subsequent requests to the authorization server. - expires_in:
The duration (in seconds) for which the request_uri is valid. In this example, it’s valid for 600 seconds (10 minutes).
The request_uri serves as a reference to the original authorization request sent to the PAR endpoint. This allows the client to send only the request_uri over the front channel, keeping sensitive data securely in the back channel and reducing the risk of exposure.
Second Request – The Authorization Request
In the second step of the PAR flow, the user’s browser is redirected to the authorization endpoint. Instead of including the full authorization parameters in the URL (as in the traditional flow), the client simply uses the request_uri returned earlier.

Here’s an example of what this request looks like:
					GET https://myidentityserver.com/connect/authorize?
client_id=localhost-addoidc-client-PAR
&request_uri=urn%3Aietf%3Aparams%3Aoauth%3Arequest_uri%3A9A7990D0AC4D844FBDB49C9451A23A8C5D41FBCC29BCF1BE201C3338C7099E5D
&x-client-SKU=ID_NET9_0
&x-client-ver=8.1.2.0 HTTP/1.1

User-Agent: Mozilla/5.0 (Windows NT 10.0; Win64; x64)...
Referer: https://localhost:5001/
In this request, the request_uri refers to the authorization data previously submitted through the back channel in the first request.
Once the user is redirected, they will go through the usual authentication and consent steps. Upon successful completion, the authorization server will send the authorization code to the client’s redirect URI:
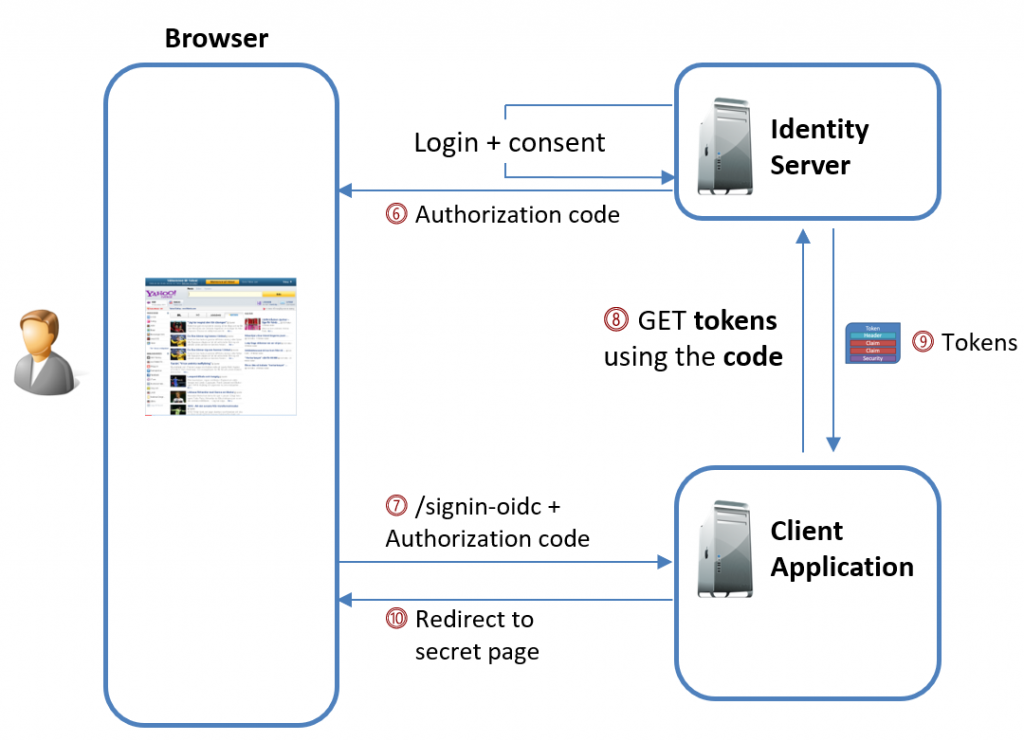
Sample request to the /signin-oidc endpoint:
					POST https://localhost:5001/signin-oidc HTTP/1.1
Content-Type: application/x-www-form-urlencoded

code=7A9404B7DA1532A0D836834263AE73CF029AFE819D4AE0A62079C23F6C6452BF-1
&scope=openid+profile+email+offline_access
&state=CfDJ8IgPXRNAZH1EkNA0dd3_Jvv5huWjaDM6DMPX...
&session_state=YiFCBw1ATTffMuEI0SFOPwjnAoorH3Jz_...
&iss=https%3A%2F%2Fmyidentityserver.com
Using this code, the OpenID Connect handler can then exchange it for the real tokens, just like how we did it in the non-PAR example.
Summary
In this blog post, we explored Pushed Authorization Requests (PAR) in ASP.NET Core 9 and how it improves the security of OAuth and OpenID Connect (OIDC) flows. PAR moves sensitive authorization parameters from the browser (front channel) to secure back-channel communication instead, offering several key benefits:
- Improved Security: Keeps sensitive data out of URLs.
- Tamper Resistance: Prevents attackers from altering authorization parameters.
- Cleaner, Shorter URLs: Especially useful in complex authorization scenarios.
Using Duende IdentityServer as an example, we showed how PAR is configured globally and at the client level. Additionally, we walked through the PAR process, including:
- The Pushed Authorization Request, where authorization data is securely sent to the server.
- The Authorization Request, where the client uses the returned request_uri to complete the authorization flow.
About the author
Hey! I’m Tore 👋 I’m an independent consultant, coach, trainer and a Microsoft certified MVP in .NET. My mission is to help developer teams to solve problems more quickly and effectively across tools and platforms like ASP.NET Core, Duende IdentityServer, web security, C#, Azure, .NET, and more. Sounds helpful? I’d love to be of service! You can check out my workshops for teams and my wider consulting and coaching services here.
PAR Resources
- OpenIdConnectHandler adds support for Pushed Authorization Requests (PAR)
- RFC-9126 OAuth 2.0 Pushed Authorization Requests
- IdentityServer Pushed Authorization Requests
- Support for Pushed Authorization Requests in OidcHandler API Proposal
