
In my previous blog post, I explained what the Forwarded Headers Middleware does and why it matters. In this post, I will show you how to add it to your application, configure it, and point out a few common issues that can arise in configuring the forwarded headers middleware.
In this blog post:
- Testing the Forwarded Headers Application
- Adding the ForwardHeaders Middleware
- Configuring ForwardHeadersMiddleware
- ForwardHeaders Middleware in Action
- Observing the Problem in the Logs
- Allowed Forwarded Headers Hosts
- The ASPNETCORE_FORWARDEDHEADERS_ENABLED variable
- Forwarded Headers in the Cloud Debugger
- Source Code
- Summary
The Sample ForwardHeaders Application
Let’s start with a new ASP.NET Core project using the empty template:

Then I updated launchSettings.json to listen on ports 5000 and 5001:
"applicationUrl": "https://localhost:5001;http://localhost:5000",
After that, I replaced the default app.MapGet() with this endpoint:
					app.MapGet("{**route}", async (HttpContext context,
                              IOptions<ForwardedHeadersOptions> forwardedOptions) =>
{
    var requestDetails = new
    {
        Protocol = context.Request.Protocol,
        Scheme = context.Request.Scheme,
        Path = context.Request.Path.Value,
        PathBase = context.Request.PathBase.Value,
        Host = context.Request.Host.ToString(),
        DisplayUrl = context.Request.GetDisplayUrl(),
        RemoteIpAddress = context.Connection.RemoteIpAddress?.ToString(),
        Headers = context.Request.Headers
                  .ToDictionary(h => h.Key, h => h.Value.ToString()),

        ForwardedHeaders = new
        {
            ForwardedHeaders = GetEnabledFlags(forwardedOptions.Value.ForwardedHeaders),
            AllowedHosts = forwardedOptions.Value.AllowedHosts.ToList(),
            KnownNetworks = forwardedOptions.Value.KnownNetworks
                            .Select(n => n.Prefix + "/" + n.PrefixLength)
                            .ToList(),
            KnownProxies = forwardedOptions.Value.KnownProxies
                            .Select(p => p.ToString()).ToList(),
            forwardedOptions.Value.ForwardLimit,
            forwardedOptions.Value.OriginalForHeaderName,
            forwardedOptions.Value.OriginalHostHeaderName,
            forwardedOptions.Value.OriginalProtoHeaderName,
            forwardedOptions.Value.OriginalPrefixHeaderName,
            forwardedOptions.Value.ForwardedForHeaderName,
            forwardedOptions.Value.ForwardedHostHeaderName,
            forwardedOptions.Value.ForwardedProtoHeaderName,
            forwardedOptions.Value.ForwardedPrefixHeaderName
        }
    };

    context.Response.ContentType = "application/json";
    await context.Response.WriteAsync(JsonSerializer.Serialize(requestDetails));
});
A small helper method is also added:
					static List<string> GetEnabledFlags(ForwardedHeaders headers)
{
    return Enum.GetValues<ForwardedHeaders>()
        .Where(flag => flag != ForwardedHeaders.None && headers.HasFlag(flag))
        .Select(flag => flag.ToString())
        .ToList();
}
When called, the endpoint responds to any request and returns the request details as seen by ASP.NET Core. It’s a simple and effective way to inspect how the middleware works. The response also includes the current configuration for the Forwarded Headers Middleware.
Testing the Forwarded Headers Application
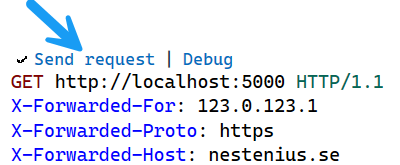
To test it, we can add a Visual Studio .http file like this one:
					GET http://localhost:5000 HTTP/1.1
X-Forwarded-For: 123.0.123.1
X-Forwarded-Proto: https
X-Forwarded-Host: nestenius.se
This lets us send requests with custom headers. To send a request to the application, you just need to start it and click the Send request link:
Since we haven’t added the Forwarded Headers middleware yet, the response will look like this:
{"Protocol":"HTTP\/1.1","Scheme":"http","Path":"\/","PathBase":"","Host":"localhost:5000","DisplayUrl":"http:\/\/localhost:5000\/","RemoteIpAddress":"::1","Headers":{"Host":"localhost:5000","X-Forwarded-For":"123.0.123.1","X-Forwarded-Proto":"https","X-Forwarded-Host":"nestenius.se"},"ForwardedHeaders":{"ForwardedHeaders":[],"AllowedHosts":[],"KnownNetworks":["127.0.0.1\/8"],"KnownProxies":["::1"],"ForwardLimit":1,"OriginalForHeaderName":"X-Original-For","OriginalHostHeaderName":"X-Original-Host","OriginalProtoHeaderName":"X-Original-Proto","OriginalPrefixHeaderName":"X-Original-Prefix","ForwardedForHeaderName":"X-Forwarded-For","ForwardedHostHeaderName":"X-Forwarded-Host","ForwardedProtoHeaderName":"X-Forwarded-Proto","ForwardedPrefixHeaderName":"X-Forwarded-Prefix"}}
From this response, we can tell that the middleware either isn’t present or has chosen to ignore the request based on its current configuration. One clear sign is that none of the X-Original-* headers were added. These headers are only set when the middleware rewrites the request using the forwarded values, which didn’t happen here.
Why not use the browser?
While you can use a browser to send basic requests, it won’t let you set custom headers like X-Forwarded-For or X-Forwarded-Host. Browsers restrict which headers can be set for security reasons. That’s why tools like .http files, Bruno, or Fiddler are much more suitable for this kind of testing. Because they let you define exactly which headers to include in your request.
What about the X-Forwarded-Prefix header?
This header deserves a blog post of its own. It’s closely tied to how PathBase works in ASP.NET Core, and things can get tricky when you’re running apps behind reverse proxies. If you want to dig deeper into how PathBase works, I recommend Andrew Lock’s excellent post: Understanding PathBase in ASP.NET Core.
Adding the ForwardHeaders Middleware
To start using the middleware, you first need to add it to the start of the request pipeline:
app.UseForwardedHeaders();
But just adding it like this won’t do anything on its own. You also need to configure it. Here’s the starting point:
					builder.Services.Configure<ForwardedHeadersOptions>(options =>
{
    //TODO: Add configuration here...
});
If you run the application now and send a test request, the output will look exactly the same as before. Nothing has changed yet.
Configuring ForwardHeadersMiddleware
By default, the middleware does not process any X-Forwarded-* headers. We can confirm this by checking the response, which shows an empty ForwardedHeaders list:
"ForwardedHeaders": [],
The ForwardedHeaders array is a core part of the middleware’s configuration. It lists which X-Forwarded-* headers the middleware is currently set up to process. Right now, it’s empty, so no headers will be considered or used when rewriting the request.
We need to tell the middleware which headers it should read explicitly to fix this. The available headers are:
- X-Forwarded-For
- X-Forwarded-Host
- X-Forwarded-Proto
- X-Forwarded-Prefix
Some proxies use different header names. If that’s the case, you can change the expected names using these configuration options:
- ForwardedForHeaderName (Default “X-Forwarded-For”)
- ForwardedHostHeaderName (Default “X-Forwarded-Host”)
- ForwardedProtoHeaderName (Default “X-Forwarded-Proto”)
- ForwardedPrefixHeaderName (Default “X-Forwarded-Prefix”)
To enable all four headers, configure the middleware like this:
					options.ForwardedHeaders = ForwardedHeaders.XForwardedFor |
                           ForwardedHeaders.XForwardedHost |
                           ForwardedHeaders.XForwardedProto |
                           ForwardedHeaders.XForwardedPrefix;
Or simply use the shortcut:
options.ForwardedHeaders = ForwardedHeaders.All;
Both of these will enable the same functionality.
In our case, we don’t want to support the X-Forwarded-Prefix header, so we leave it out on purpose:
					options.ForwardedHeaders = ForwardedHeaders.XForwardedFor |
                           ForwardedHeaders.XForwardedHost |
                           ForwardedHeaders.XForwardedProto;
Being explicit about which headers you want to support is a good practice.
Why do we need to configure this?
It gives you control over which headers the middleware should support and which ones to ignore. Which headers you need to support depends on the proxy that you use and how your infrastructure is set up. Not all proxies send the same headers; some may only use a subset. Being explicit helps avoid misconfigurations and improves security.
Now restart the application and send the request again. You should now see that the ForwardedHeaders array contains the expected headers:
					"ForwardedHeaders": [
  "XForwardedFor",
  "XForwardedHost",
  "XForwardedProto"
],
ForwardHeaders Middleware in Action
With the ForwardedHeaders option set, the middleware is now active. It will look for the headers you’ve configured and rewrite the request based on their values.
Let’s compare what the request looks like before and after enabling the middleware:
Before
{
  "Protocol": "HTTP/1.1",
  "Scheme": "http",
  "Path": "/",
  "PathBase": "",
  "Host": "localhost:5000",
  "DisplayUrl": "http://localhost:5000/",
  "RemoteIpAddress": "::1",
  "Headers": {
  "Host": "localhost:5000",
  "X-Forwarded-For": "123.0.123.1",
  "X-Forwarded-Proto": "https",
  "X-Forwarded-Host": "nestenius.se"
},
After
{
  "Protocol": "HTTP/1.1",
  "Scheme": "https",
  "Path": "/",
  "PathBase": "",
  "Host": "nestenius.se",
  "DisplayUrl": "https://nestenius.se//",
  "RemoteIpAddress": "123.0.123.1",
  "Headers": {
    "Host": "nestenius.se",
    "X-Original-Proto": "http",
    "X-Original-Host": "localhost:5000",
    "X-Original-For": "[::1]:61781"
},
The middleware has updated the Scheme, Host, and RemoteIpAddress fields using the values from the X-Forwarded-* headers.
At the same time, the original values have been preserved in the X-Original-* headers. This lets your application know what was received and rewritten, which is helpful for diagnostics and auditing.
ForwardHeadersMiddleware in Production
Let’s say you take the code above and deploy it to a production environment where a reverse proxy (like NGINX, Traefik, or a load balancer) sits between the users and your web application. This proxy is a separate service that forwards requests to your app and adds the appropriate X-Forwarded-* headers.
But now… it stops working. Why?
This is the setup:
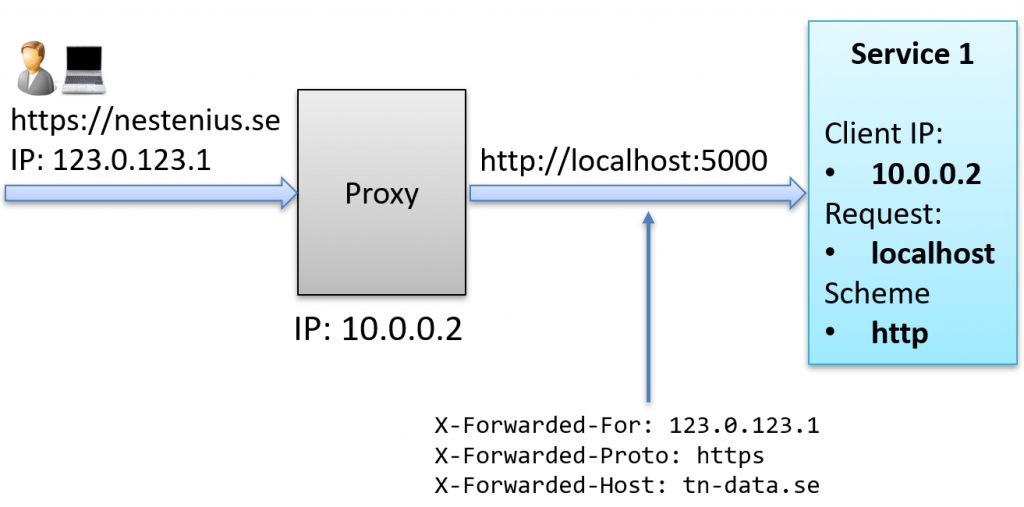
The problem is that the middleware only trusts requests from known sources, meaning known proxies or networks. By default, it only trusts local addresses. If we look at the response from our application, we’ll see these two configuration settings that control this:
					    "KnownNetworks": [
      "127.0.0.1/8"
    ],
    "KnownProxies": [
      "::1"
    ],
This means the forwarded headers will be ignored unless the request comes from either:
- An address in the 127.0.0.1/8 network range (IPv4 localhost)
- The specific address ::1 (IPv6 localhost)
You might wonder why the middleware doesn’t just trust all incoming addresses. Well, that would be a security risk! If any IP could forward headers, a malicious client could spoof values like the original IP address, scheme, or host, which could then break logging, access control, or other logic that depends on those details.
How the Trust Check Works Internally
If we look at the source code of the Forwarded Headers Middleware, we find a method that decides whether the IP address of the incoming request is allowed:
					private bool CheckKnownAddress(IPAddress address)
{
    if (address.IsIPv4MappedToIPv6)
    {
        var ipv4Address = address.MapToIPv4();
        if (CheckKnownAddress(ipv4Address))
        {
            return true;
        }
    }
    if (_options.KnownProxies.Contains(address))
    {
        return true;
    }
    foreach (var network in _options.KnownNetworks)
    {
        if (network.Contains(address))
        {
            return true;
        }
    }
    return false;
}
This code shows that a request is trusted if its IP address matches an entry in the KnownProxies list or falls within a configured KnownNetworks range.
Testing Without a Real Proxy
How can we test the proxy’s behavior without setting up an entire proxy environment?
One way is to fake it. You can add a simple middleware before UseForwardedHeaders that overrides the RemoteIpAddress. This lets you simulate a request coming from a specific proxy IP address. Here’s how that looks:
					app.Use(async (context, next) =>
{
    // Spoof RemoteIpAddress
    context.Connection.RemoteIpAddress = IPAddress.Parse("10.0.0.2");

    await next();
});

app.UseForwardedHeaders();
If you now send a test request to the application, it will ignore the X-Forwarded-* headers because the spoofed IP address (10.0.0.2) is not on the list of trusted proxies or networks.
Observing the Problem in the Logs
When the Forwarded Headers Middleware rejects a request, it will write a debug entry to the log. It can also emit warnings for other issues, such as malformed headers or configuration problems. You need to increase the log level for the middleware’s namespace to see all of these messages.
In your appsettings.json, update the logging section like this:
{"Logging":{"LogLevel":{"Default":"Information","Microsoft.AspNetCore":"Warning","Microsoft.AspNetCore.HttpOverrides":"Debug"}},"AllowedHosts":"*"}
The key part is setting the log level for the Microsoft.AspNetCore.HttpOverrides namespace to Debug.This enables more logging from the Forwarded Headers Middleware.
Now, if we run the application with the spoofed IP address in place, we should see a message like this in the console:
					dbug: Microsoft.AspNetCore.HttpOverrides.ForwardedHeadersMiddleware[1]
      Unknown proxy: 10.0.0.2:65529
This confirms that the forwarded headers were ignored because the request did not come from a trusted source.
Fixing the Unknown proxy problem
To fix the issue, we need to tell the middleware which proxies or networks we trust. In our example, the proxy uses the IP address 10.0.0.2.
We have two options:
Trust a specific proxy IP
To trust just one IP address, you can configure it like this:
					options.KnownProxies.Clear();
options.KnownProxies.Add(IPAddress.Parse("10.0.0.2"));
First, we clear the list to remove the default entry for localhost (::1). If you’re not using localhost in production, there’s no reason to keep it trusted.
Trust a network range
If your proxy could use different IPs within a subnet, it’s better to trust a full network range:
					options.KnownNetworks.Clear();
options.KnownNetworks.Add(new IPNetwork(IPAddress.Parse("10.0.0.0"), 24));
This allows traffic from the entire 10.0.0.0/24 range (10.0.0.0 to 10.0.0.255) to be trusted.
By adding either of these configurations, the middleware will now accept forwarded headers from your proxy at 10.0.0.2.
Restricting where these headers are accepted from really is critical. Trusting all of the sources would allow clients to spoof X-Forwarded-* headers, which could affect security, logging, or routing behavior.
Allowed Forwarded Headers Hosts
Another important part of the Forwarded Headers Middleware is how it handles the X-Forwarded-Host header.
By default, the middleware will accept any value in the X-Forwarded-Host header. This means that a client or proxy could send in any hostname, and the middleware would apply it without restrictions.
To tighten this risky behavior, you can use the AllowedHosts setting in the ForwardedHeadersOptions configuration.
					    options.AllowedHosts.Clear();
    options.AllowedHosts.Add("nestenius.se");
With this configuration, only forwarded requests that include X-Forwarded-Host: nestenius.se will be accepted and applied. Any other value will be ignored.
The ASPNETCORE_FORWARDEDHEADERS_ENABLED variable
If you’ve worked with ASP.NET Core in Azure App Service or Azure Container Apps, you might have encountered the ASPNETCORE_FORWARDEDHEADERS_ENABLED environment variable.
This environment variable controls whether ASP.NET Core will automatically add the Forwarded Headers Middleware to your application during startup.
Like when you use the default host builder like this:
var builder = WebApplication.CreateBuilder(args);
If the ASPNETCORE_FORWARDEDHEADERS_ENABLED is set to true, ASP.NET Core will automatically call UseForwardedHeaders() behind the scenes. You don’t have to add it manually to the middleware pipeline.
This behavior is implemented in a component called ForwardedHeadersStartupFilter (source code).
Okay, so let’s explore this next!
Testing ASPNETCORE_FORWARDEDHEADERS_ENABLED
We will remove the manual middleware setup from the application to test this feature.
Comment out these two lines:
					//builder.Services.Configure<ForwardedHeadersOptions>(options =>
//{
//    //TODO: Add configuration here...
//});

//app.UseForwardedHeaders();
If you send a test request with X-Forwarded-* headers, they should be ignored. This is to be expected, since the middleware is no longer active.
Enabling the Middleware via Environment Variable
Next, let’s enable it using the ASPNETCORE_FORWARDEDHEADERS_ENABLED environment variable. The easiest way to do that is by adding it to your launchSettings.json:
					...
"https": {
  "commandName": "Project",
  "dotnetRunMessages": true,
  "launchBrowser": true,
  "applicationUrl": "https://localhost:5001;http://localhost:5000",
  "environmentVariables": {
    "ASPNETCORE_ENVIRONMENT": "Development",
    "ASPNETCORE_FORWARDEDHEADERS_ENABLED": "true"
  }
}
...
The FORWARDEDHEADERS_ENABLED setting
If you’d prefer not to use environment variables, you can enable the Forwarded Headers Middleware by setting the FORWARDEDHEADERS_ENABLED flag to true in your appsettings.json:
					{
  ...
  "FORWARDEDHEADERS_ENABLED": "true"
}
Why Spoofing the IP No Longer Works
If you now try to spoof the remote IP address with a middleware like this:
					app.Use(async (context, next) =>
{
    // Spoof RemoteIpAddress
    context.Connection.RemoteIpAddress = IPAddress.Parse("10.0.0.2");

    await next();
});
…it won’t work as expected.
The Forwarded Headers Middleware is already executed before this custom middleware. When you enable it using the ASPNETCORE_FORWARDEDHEADERS_ENABLED environment variable, it’s added automatically at the very start of the pipeline by the internal ForwardedHeadersStartupFilter.
By the time your spoofing code runs, the middleware has already processed the request using the original RemoteIpAddress. So, changing it afterward has no effect. The forwarded headers will be ignored if the request appears to come from an untrusted IP (like ::1 or 127.0.0.1), and you won’t be able to simulate a proxy this way.
Custom Configuration with FORWARDEDHEADERS_ENABLED
When the ASPNETCORE_FORWARDEDHEADERS_ENABLED environment variable is set to true, or the FORWARDEDHEADERS_ENABLED setting is enabled in your configuration, the Forwarded Headers Middleware is automatically added at the beginning of the request pipeline.
By default, this middleware uses a built-in configuration that:
- Processes the X-Forwarded-For and X-Forwarded-Proto headers
- Clears the list of trusted proxies and networks (meaning none are trusted)
This behavior comes from the internal ForwardedHeadersOptionsSetup class, which you can find here: ForwardedHeadersOptionsSetup.
Overriding the Default Configuration
To override this behavior, you can manually configure the options in your Program class:
					builder.Services.Configure<ForwardedHeadersOptions>(options =>
{
    options.ForwardedHeaders = ForwardedHeaders.All;
    options.KnownProxies.Clear();
    options.KnownProxies.Add(IPAddress.Parse("10.0.0.2"));
});
Using appsettings.json
You can also use appsettings.json to configure the middleware:
					  "ForwardedHeaders": {
    "ForwardedHeaders": "XForwardedFor,XForwardedHost,XForwardedProto",
    "ForwardLimit": 1,
    "RequireHeaderSymmetry": true,
    "KnownProxies": [ "::1" ],
    "KnownNetworks": [ "127.0.0.1/8" ],
    "AllowedHosts": [ "nestenius.se" ]
  }
To apply this configuration, you still need to bind it in code using:
builder.Services.Configure<ForwardedHeadersOptions>(builder.Configuration.GetSection("ForwardedHeaders"));
Without this line, the settings from appsettings.json will be ignored, and the middleware will fall back to its built-in defaults.
Forwarded Headers in the Cloud Debugger
The Cloud Debugger is the perfect tool for exploring how forwarded headers are used in practice, especially in environments like Azure App Services or Azure Container Apps.
The Cloud Debugger is an open-source tool I created using ASP.NET Core 9. It’s designed to help developers, architects, and DevOps teams inspect, explore, and debug HTTP requests and Azure-specific behaviors in live cloud deployments.
You can deploy it directly to Azure as an App Service or Container App. Once it’s running, it provides a browser-based interface with several built-in tools to inspect HTTP headers, understand how forwarded headers are handled, and explore its middleware configurations tools.
Source Code
You can find the source code related to this blog post on GitHub.
Summary
Writing this blog post has been a deep and practical journey into the world of proxies, forwarded headers, and how ASP.NET Core handles these scenarios under the hood.
We started with a minimal app to explore how the middleware works in a controlled environment. Then, we stepped through configuration options, common pitfalls, and production considerations like trusted proxies and forwarded host validation. We also looked at how to test proxy scenarios locally, how logging can help when things don’t behave as expected, and what happens when you enable the middleware using the ASPNETCORE_FORWARDEDHEADERS_ENABLED environment variable.
Even though we covered a lot, there are still more advanced topics to explore! Topics like support for multiple proxy layers, deeper integration with Kubernetes ingress controllers, and the details of how PathBase actually interacts with X-Forwarded-Prefix.
If you’re deploying applications behind a reverse proxy or load balancer, you can consider getting familiar with this middleware as time well spent!
And don’t forget, if you want to explore how Azure handles forwarded headers in real-world environments, check out the open-source Cloud Debugger. It’s a practical tool for testing, learning, and debugging how ASP.NET Core behaves when it’s deployed behind Azure front ends.
Resources
Related Training Workshops
Writing this blog post has been a deep and practical journey into the world of proxies, forwarded headers, and how ASP.NET Core handles these scenarios under the hood.
We started with a minimal app to explore how the middleware works in a controlled environment. Then, we stepped through configuration options, common pitfalls, and production considerations like trusted proxies and forwarded host validation. We also looked at how to test proxy scenarios locally, how logging can help when things don’t behave as expected, and what happens when you enable the middleware using the ASPNETCORE_FORWARDEDHEADERS_ENABLED environment variable.
Even though we covered a lot, there are still more advanced topics to explore! Topics like support for multiple proxy layers, deeper integration with Kubernetes ingress controllers, and the details of how PathBase actually interacts with X-Forwarded-Prefix.
If you’re deploying applications behind a reverse proxy or load balancer, you can consider getting familiar with this middleware as time well spent!
And don’t forget, if you want to explore how Azure handles forwarded headers in real-world environments, check out the open-source Cloud Debugger. It’s a practical tool for testing, learning, and debugging how ASP.NET Core behaves when it’s deployed behind Azure front ends.
About the Author
Hey! I’m Tore 👋 I’m an independent consultant, coach, trainer and a Microsoft certified MVP in .NET. My mission is to help developer teams to solve problems more quickly and effectively across tools and platforms like ASP.NET Core, Duende IdentityServer, web security, C#, Azure, .NET, and more. Sounds helpful? I’d love to be of service! You can check out my workshops for teams and my wider consulting and coaching services here.
More Blog Posts by the Author
- Exploring the Forwarded Headers Middleware in ASP.NET Core
- Introducing the Cloud Debugger for Azure
- Debugging cookie problems in ASP.NET Core
- Improving ASP.NET Core Security By Putting Your Cookies On A Diet
- Persisting the ASP.NET Core Data Protection Key Ring in Azure Key Vault
- Introducing the Coding Agent Explorer (.NET)