
This blog post describes getting Docker up and running inside an Azure Windows Virtual Machine. This might sound like a simple task, but trust me, there are some surprises on the way that took me a day or so to figure out.
Why run docker in an Azure Virtual Machine?
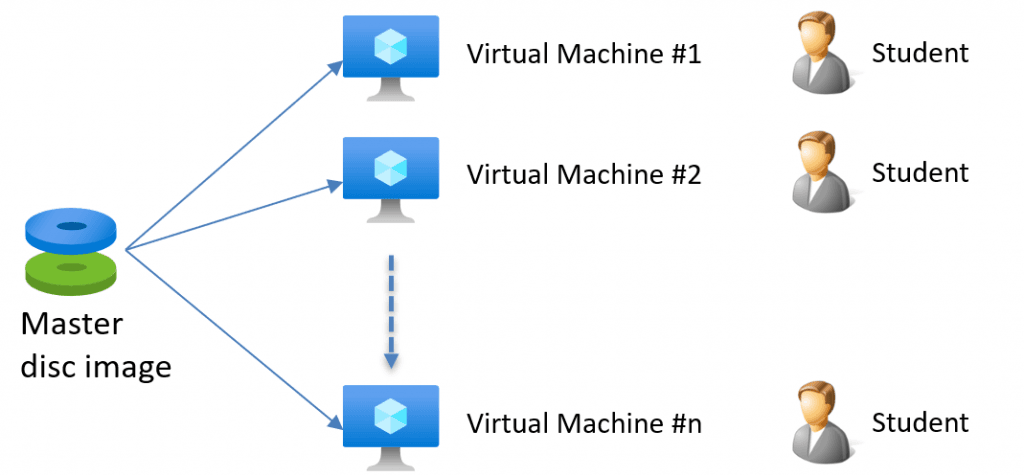
As a trainer, I need to provide a consistent, pre-configured environment where students can focus on learning without the hassle of setting up their own machines. Many of my exercises rely on Docker, but in environments like government or corporate settings, strict security policies often prevent students from installing Docker Desktop.
By using Azure virtual machines, I sidestep these restrictions, ensuring that everyone has a uniform setup. This approach also helps avoid issues like local firewalls blocking network requests, which is especially important during security training sessions.
Best of all, it allows me to focus on delivering the training itself without worrying about technical setup when I arrive at a customer site.
The Master Image
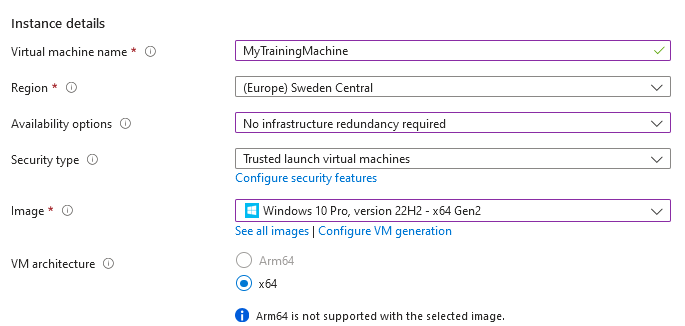
I update the master image 1-2 times yearly, and the process has worked great! But one day a few years ago, a few days before my next training class, I decided to rebuild the image. I created the virtual machine in the Azure portal asI have always done, like this:
After the image was created, I logged in to the master machine using a remote desktop, applied all the various updates, and installed the various software packages. All going well until it was time to install Docker. Installing Docker has worked fine in the past, but to my surprise, this time, it did not work! Why?
Perhaps I missed some steps in my documented process, so I recreated the VM and tried again. However, it still fails with the same error. From previous experience, I know that that installation of Docker can be a bit unreliable. However, it is still not starting after installation!
I was getting weird errors like this one:
deploying WSL2 distributions
ensuring main distro is deployed: deploying "docker-desktop": importing WSL distro "WSL2 is not supported with your current machine configuration.

Please enable the "Virtual Machine Platform" optional component and ensure virtualization is enabled in the BIOS.
Enable "Virtual Machine Platform" by running: wsl.exe --install --no-distribution

For information please visit https://aka.ms/enablevirtualization
Error code: Wsl/Service/RegisterDistro/CreateVm/HCS/HCS_E_HYPERV_NOT_INSTALLED" output="docker-desktop": exit code: 4294967295:

running WSL command wsl.exe C:\Windows\System32\wsl.exe --import docker-desktop \AppData\Local\Docker\wsl\main C:\Program Files\Docker\Docker\resources\wsl\wsl-bootstrap.tar --version 2:
WSL2 is not supported with your current machine configuration.

Please enable the "Virtual Machine Platform" optional component and ensure virtualization is enabled in the BIOS.
Enable "Virtual Machine Platform" by running: wsl.exe --install --no-distribution
For information please visit https://aka.ms/enablevirtualization
Error code: Wsl/Service/RegisterDistro/CreateVm/HCS/HCS_E_HYPERV_NOT_INSTALLED

: exit status 0xffffffff

checking if isocache exists: CreateFile \\wsl$\docker-desktop-data\isocache\: The network name cannot be found.
When I encountered this issue a few years ago, I didn’t receive an error message as helpful as the one I got today when I tested it for this blog post. The error seems to be related to the BIOS, but since this is a VM, I can’t access the BIOS settings. This feature has worked fine before, so I doubt the BIOS is the problem.
Additionally, the VM type supports nested virtualization, so that isn’t the issue either.
Troubleshooting Docker in Azure Virtual Machine
Ok, so let’s troubleshoot!
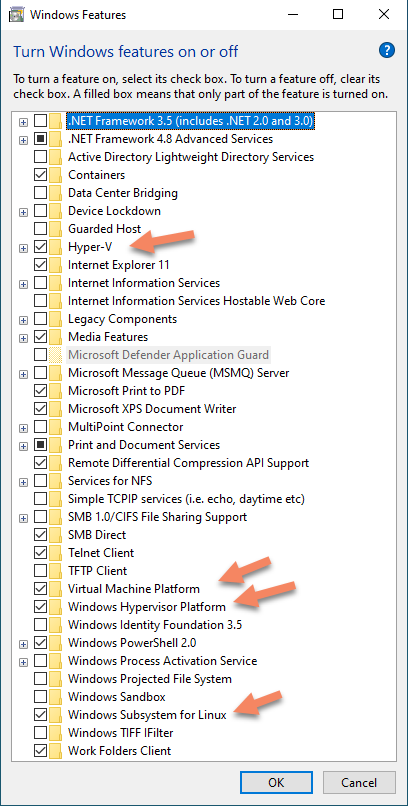
The first step is to check what Windows features are installed. Are WSL and Hyper-V installed? Under my Windows Features, everything looks good—nothing out of the ordinary.
Solving the mystery that blocks Docker in an Azure VM
After a long period of searching on Google and reviewing GitHub issues, I began to find indications that suggest an absence of virtualization support. It’s strange because running Docker in Azure Virtual Machine has worked fine for me in the past.
But let’s confirm this by first looking at the Task Manager.
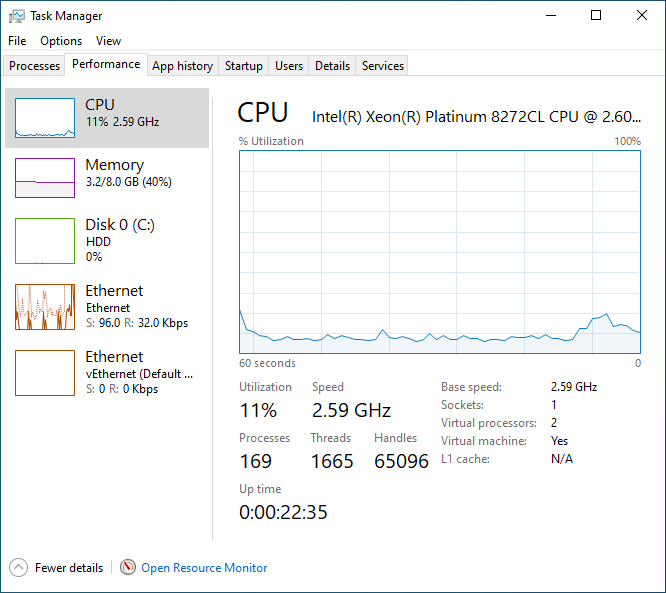
Something is missing here!

Why is virtualization disabled?
Apparently, the virtualization feature is not present in my Virtual Machine. Did you notice my mistake when I created the virtual machine above? No, that is easy to miss!
Apparently, a new concept called Trusted Launch Virtual Machines has been introduced. Trusted machines sound like a good idea! This is now the default setting when creating a new virtual machine.

However, when I created my virtual machine, I didn’t notice this new feature or think that it would be a big deal. It turns out that this feature disables virtualization inside the VM. ☹
Restoring Virtualization for Docker in Azure VM
The solution is to select the standard security type when creating a new virtual machine.
Now it works!
Annoying dark patterns in Azure Portal
I find it quite frustrating that when I’m creating a new Virtual Machine in the portal, the default OS disk type is set to the more expensive Premium SSD type. This can be costly when creating non-critical test machines in the cloud. In my opinion, the default setting should be Standard SSD, which is more sensible.

I once received a cloud bill of over 1000 USD because I forgot to delete a bunch of disk images. These images were all on a Premium SSD disk. ☹
Summary
Things like this can really drive you crazy, and these small details can be really hard to find! During this frustrating incident, I spent about a day trying to figure it out. I then coined this quote:
“Cloud development: making developers cry since the early 2000s.”
The experience of developing for the cloud can be pretty challenging. Spending days trying to achieve what seems obvious or simple can be frustrating.
Do you agree with the pain of web development?
(Ps, I didn’t cry  )
)
Feedback, comments, found any bugs?
Let me know if you have any feedback, If I missed anything or any bugs/typos. You can find my contact details here.About the author
Hey! I’m Tore 👋 I’m an independent Microsoft MVP-certified trainer, consultant and coach for developers in Azure and beyond. As an AZ-204 certified developer, I deliver step-by-step trainings using tools like our own cloud debugger for Azure, helping developers to power-up their cloud skills and take their applications to the next level. Sounds helpful? You can check out my Introduction to Azure for Developers course to find out more or get an extra pair of eyes and hands for your cloud project here!