In this blog post, I will guide you through deploying a custom container image to Azure App Services from a private container registry using a system-assigned managed identity and the Azure CLI.
We will focus on leveraging the system-assigned managed identity approach in this article. For those interested in using a user-assigned managed identity, a separate post covering that method can be found here.
If you want to know more about managed identities in Azure, visit the article What are managed identities for Azure resources?
Background
In my previous blog post, I covered deploying a container image to Azure App Services using a user-assigned managed identity. This blog post will show how this can be simplified using a system-assigned managed identity.
This blog post will focus on the differences compared with the previous approach, so head over to that one first before you read this blog post.
User vs. system-assigned identity
In the world of Azure identities, it’s crucial to understand the distinction between user-assigned and system-assigned identities. Let’s explore the key differences.
User-Assigned Identities
In our previous post, we delved into user-assigned identities. Here’s a recap of the essentials:
- Independent Creation: The identity is created separately from the App Service resource.
- Flexible Assignment: This identity can be assigned to multiple resources, providing flexibility.
- Lifecycle Management: Developers are responsible for managing the identity’s lifecycle.
- Longevity: User-assigned identities can be long-lived, making them ideal for applications that require consistent identity usage over time.
System-assigned identities
These identities share similarities with user-assigned identities but with some key differences:
- Automatic Creation: Azure creates the identity when the resource is created.
- Resource-Specific: The identity is tied to a specific resource.
- Automatic Deletion: The identity is deleted when the resource is deleted.
- Scoped to Resource: The identity is limited to the specific resource it is assigned to.
The primary advantage of system-assigned identities is the convenience that they offer. Azure manages the creation and deletion of these identities which reduces the manual effort required.
Understanding these differences helps in choosing the right identity type for your Azure resources so that they can be securely and efficiently managed.
Let’s explore how using system assigned identities can simplify the effort to deploy a container image to Azure App Services.
Important:
- I am not a regular PowerShell developer.
- I would like to get feedback on the script! How can I improve it? Bugs? Style? Or am I doing it wrong?
Part 1 – The settings file
The Settings.ps1 file is almost the same as the one we used before, with the key difference being that we do not need to specify any identityName. The script is as follows:
					# resource group name
$rgname = 'MyTestResourceGroup'

# location
$location = 'swedencentral'

# The name of the App Service Plans
$AppServicePlan_linux = 'asp-MyApp-Linux-dev'

# The SKU of the App Service Plans
$AppServicePlanSKU_Linux = 'S1'     # Standard plan

# The name of the App Services
$AppServiceName_container_linux = 'MyApp-Linux-Container-dev'

# Azure container registry name
$ACRName = 'tncontaineregistry'

# AzureRover container image name
$imagename = 'mycontainerimage'
Part 2 – Creating the Azure App Service infrastructure
The script 1-Infrastructure.ps1 that creates the initial infrastructure can be handily reduced to the following:
					 Step 1: Create the resource group
Write-Host "`n`nCreating the resource group."
$resgroup = az group create `
        --name $rgname `
        --location $location `
        | ConvertFrom-Json
$resId = $resgroup.id
Write-Host "Resource group created, id: ${resId}"

# Step 2: Create Azure Container Registry
Write-Host "`n`nCreating the Azure Container Registry."
$acr = az acr create `
        --resource-group $rgname `
        --name $ACRName `
        --sku Basic `
        --admin-enabled true `
        | ConvertFrom-Json


$acrid = $acr.id
Write-Host "Azure Container Registry created, id: ${acrid}"
Here, the big difference is that we don’t have to create any identity manually. After running the above script, you should only find one resource in your resource group:

Part 3 – Pushing the docker image to the container
Creating the container image locally is beyond the scope of this blog post. However, the script below (found in 2-BuildAndPushDockerImage.ps1) will log in to ACR, tag, and push the image to the ACR.
					. .\Settings.ps1

# Step 1: Log in to the Azure Container Registry
Write-Host "`n`nLogging into Azure Container Registry '${ACRName}'."
Write-Host "If this step hangs, ensure Docker is running locally."
az acr login --name $ACRName

# Step 2 Tag the local Docker image with the registry server name of your ACR
$taggedImage = "${ACRName}.azurecr.io/${imagename}:latest"
$localImageName = "mycontainerimage"
Write-Host "`n`nTagging the Docker image '${localImageName}' with '${taggedImage}'."
docker tag $localImageName $taggedImage
					# Step 3: Push the local image to Azure Container Registry
Write-Host "`n`nPushing the Docker image '${taggedImage}' to ACR."
docker push $taggedImage
The script above assumes you have an image named “mycontainerimage” in your local Docker environment and this script is the same as we used in the previous blog post.
After you run the script, you should be able to find the image in the registry within the portal:
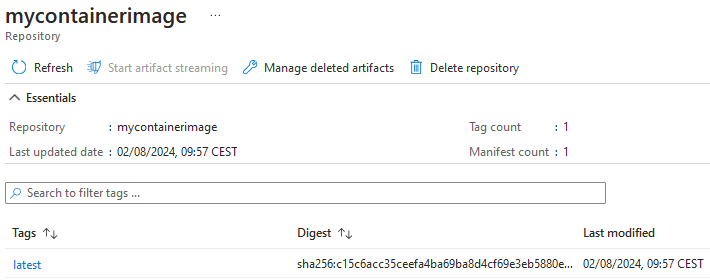
After this step, we assume that a container image is in a registry with the following URL:
tncontaineregistry.azurecr.io/mycontainerimage:latest
Part 4 – Creating the Azure App Service
This script is simpler compared to the script we used in the previous blog post. The goal of this script is to perform the following steps:
- Retrieve the ID of the Azure Container Registry.
- Create the Linux App Service Plan.
- Create the container App Service.
- Set the identity in the App Service to access the ACR.
- Verify the ACR identity.
- Enable Application Logging (Filesystem).
- Enable log streaming (optional).
This script, named 3-CreateAppService-UserAssigned.ps1, is a bit bigger, so we will review it step by step in detail below.
Step #1 – Get the ID of the Azure Container Registry
We first need to retrieve the ID of the registry we created earlier and we can do this by using:
					Write-Host "`nQuerying for the container registry ID"
$acr = az acr show `
    --name $acrName `
    --resource-group $rgname `
    --output json | ConvertFrom-Json
$acrId = $acr.id
Write-Host "ACR found with ID: ${acrId}"
Step #2 – Create the Linux App Service Plan
The next step involves creating a Linux-based App Service Plan which is required to host and run your App Services. In this part, we don’t do anything unusual:
					Write-Host "`nCreating the Linux App Service Plan"
$servicePlan = az appservice plan create `
    --name $AppServicePlan_linux `
    --resource-group $rgname `
    --is-linux `
    --sku $AppServicePlanSKU_Linux `
    --output json | ConvertFrom-Json
$servicePlanId = $servicePlan.id
Write-Host "App Service Plan created with id: ${servicePlanId}"
Step #3 – Create the Azure Container App Service
The next step is to create the container-based App Service to run on the previously created App Service Plan. This time, we will use a system-assigned identity:
					$imagePath = "${acrname}.azurecr.io/${imagename}:latest"
Write-Host "`n`nCreating the container App Service."
Write-Host "With the following image ${imagePath}"
$AppService = az webapp create `
    --name $AppServiceName_container_linux `
    --acr-use-identity `
    --plan $AppServicePlan_linux `
    --resource-group $rgname `
    --container-image-name $imagePath `
    --assign-identity [System] `
    --role "AcrPull" `
    --scope $acrId `
    --output json | ConvertFrom-Json
$hostName = $AppService.defaultHostName
$appServiceID = $AppService.id
Write-Host "App Service created, id: ${appServiceID}"
What has changed compared to the user-assigned identity approach?
- Identity Assignment: Instead of manually creating and assigning an identity, we use the –assign-identity [system] parameter. This tells Azure to create a system-assigned identity as part of the service creation.
- Role Specification: The role parameter is used to define the role for the identity, ensuring it has the necessary permissions to pull an image from the registry.
- Scope Definition: The scope parameter specifies the scope within which the role will be applied, ensuring the identity has access to the container registry.
So in short, this all means a simpler and streamlined setup that works precisely to your needs compared to the approach using user-assigned identity. Pretty cool, right?
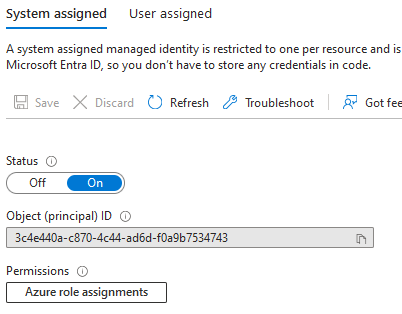
Reviewing the Azure App Service identity
In the portal, Azure created a system-assigned identity for us, and we can see this under Settings -> Identity:
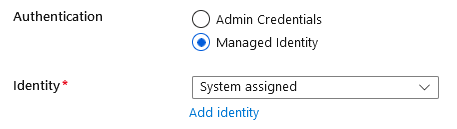
This identity was assigned the AcrPull role:

Are we done?
Yes, running the script will successfully deploy the container image and we no longer see the dreadful application error page as we did before! We’ve also simplified the deployment script a bit.
Summary
Writing these two blog posts about container deployment to Azure App Services has been both a challenging and educational journey into the intricacies of Azure and PowerShell. If you’re on the journey too, I’d encourage you to read the previous blog post Deploy containers Azure App Services using user-assigned managed identity alongside this one to compare these two approaches.
In conclusion, using the system-assigned identity approach for App Services significantly simplifies the process. However, it would be even more streamlined if Microsoft allowed specifying the ACR identity directly in the az webapp create command. This enhancement would further simplify the deployment process and the developer experience.
You can find the complete scripts here here
Feedback, comments, found any bugs?
Let me know if you have any feedback, if I missed anything, or if you have any bugs/typos. You can find my contact details hereAbout the author
Hey! I’m Tore 👋 I’m an independent Microsoft MVP-certified trainer, consultant and coach for developers in Azure and beyond. As an AZ-204 certified developer, I deliver step-by-step trainings using tools like our own cloud debugger for Azure, helping developers to power-up their cloud skills and take their applications to the next level. Sounds helpful? You can check out my Introduction to Azure for Developers course to find out more or get an extra pair of eyes and hands for your cloud project here!