This blog post describes my approach to successfully deploying a custom container image to Azure App Services from a private container registry, using a user-assigned managed identity and the Azure CLI.
This blog post will cover how to do this using a user-assigned managed identity, and a separate post will cover how to do this using a system-assigned managed identity.
Why I Did This
For this project my goal was clear: I wanted to deploy a custom Linux container from Azure Container Registry and host it in Azure App Services. Although there are many hosting alternatives in Azure, my focus was on achieving this specific deployment using Azure App Services.
Here’s the constraints I set:
- The script should be fully scripted using Azure CLI and PowerShell, not Bicep or ARM templates.
- The container image should be hosted in a private repository in an Azure Container Registry.
- I want to properly utilize a user-assigned managed identity for my App Service to pull the image from the registry, instead of using the admin username/password approach.
- The script should create all the necessary resources, including the resource group, app-service plan, and more.
Out of scope for this blog post:
- The creation of the container image.
- Proper error handling.
- Using deployment slots or using a CI/CD system.
I thought this would be easy, but boy, was I wrong! I assumed it would only take a few hours because I’ve been using Azure App Services for some time. However, this project turned out to be quite challenging. I encountered bugs, unexpected issues, confusing documentation, and frustration.
Eventually, I was able to make something work, and now I’m sharing my findings with you in this blog post so you don’t have to go through the same pain and suffering.
Important:
- I am not a regular PowerShell developer.
- I would like to get feedback on the script! How can I improve it? Bugs? Style? Or am I doing it wrong?
- I did all of this as part of my AZ-204 certification study.
Part 1 – The Settings file
I will be utilizing multiple scripts to accomplish my objectives and all the scripts can be found here. To get started, I created a shared Settings.ps1 file that consolidates all the settings for this deployment. This script should be fairly self-explanatory and it looks like this:
					# resource group name
$rgname = 'MyTestResourceGroup'

# location
$location = 'swedencentral'

# My identity name
$identityName = 'MyAppIdentity'

# The name of the App Service Plans
$AppServicePlan_linux = 'asp-MyApp-Linux-dev'

# The SKU of the App Service Plan
$AppServicePlanSKU_Linux = 'S1'     # Standard plan

# The name of the App Services
$AppServiceName_container_linux = 'MyApp-Linux-Container-dev'

# Azure container registry name
$ACRName = 'tncontaineregistry'

# AzureRover container image name
$imagename = 'mycontainerimage'
Part 2 – Creating the infrastructure
Next, we need to do the following:
- Create a resource group.
- Create a managed identity.
- Create an Azure Container Registry.
- Assign the AcrPull role to the identity to pull images from the registry.
I will call this script “1-Infrastructure.ps1,” and it looks like this:
					#Run the settings script
. .\Settings.ps1

# Step 1: Create the resource group
Write-Host "`n`nCreating the resource group."
$resgroup = az group create `
        --name $rgname `
        --location $location `
        | ConvertFrom-Json
$resId = $resgroup.id
Write-Host "Resource group created, id: ${resId}"

# Step 2: Create a managed identity
Write-Host "`nCreating a managed identity."
$identity = az identity create `
        --name $identityName `
        --resource-group $rgname `
        --output json | ConvertFrom-Json
$identityId = $identity.id
$principalId = $identity.principalId
Write-Host "User-assigned managed identity created"
Write-Host "name: ${identityName}"
Write-Host "id: ${identityId}"h
Write-Host "PrincipalId: ${principalId}"

Write-Host "`nWaiting 30s to ensure the identity is fully registered and propagated in Azure AD..."
# The AcrPull assignment might otherwise fail.
Start-Sleep -Seconds 30

# Step 3: Create Azure Container Registry
Write-Host "`n`nCreating the Azure Container Registry."
$acr = az acr create `
        --resource-group $rgname `
        --name $ACRName `
        --sku Basic `
        --admin-enabled true `
        | ConvertFrom-Json

$acrid = $acr.id
Write-Host "Azure Container Registry created, id: ${acrid}"

# Step 4: Assign the AcrPull role to the managed identity on the ACR
Write-Host "`n`nAssigning AcrPull role to the managed identity."
$role = az role assignment create `
        --assignee $principalId `
        --role "AcrPull" `
        --scope $acrid `
        --output json `
        | ConvertFrom-Json

The MyAppIdentity identity should also have been assigned the AcrPull role:

Part 3 – Pushing the image to the container
Creating the container image locally is beyond the scope of this blog post. However, the script (found in 2-BuildAndPushDockerImage.ps1) to log in to ACR, tag, and push the image is below.
					. .\Settings.ps1

# Step 1: Log in to the Azure Container Registry
Write-Host "`n`nLogging into Azure Container Registry '${ACRName}'."
Write-Host "If this step hangs, ensure Docker is running locally."
az acr login --name $ACRName

# Step 2 Tag the local Docker image with the registry server name of your ACR
$taggedImage = "${ACRName}.azurecr.io/${imagename}:latest"
$localImageName = "mycontainerimage"
Write-Host "`n`nTagging the Docker image '${localImageName}' with '${taggedImage}'."
docker tag $localImageName $taggedImage

# Step 3: Push the local image to Azure Container Registry
Write-Host "`n`nPushing the Docker image '${taggedImage}' to ACR."
docker push $taggedImage
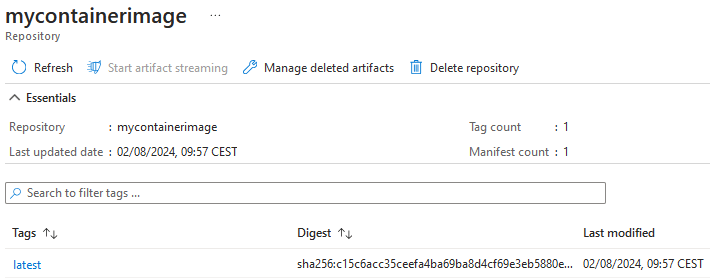
The script above assumes you have an image named “mycontainerimage” in your local Docker environment.
After you run the script, you should be able to find the image in the registry in the portal:
Part 4 – Creating the App Service
This part was challenging as I spent much time on trial and error. The goal of this script is to perform the following steps:- Retrieve details about the existing managed identity.
- Create the Linux App Service Plan.
- Create the container App Service.
- Set the identity in the App Service to access the ACR.
- Verify the ACR identity.
- Enable Application Logging (Filesystem).
- Enable log streaming (optional).
Step #1 – Getting the Managed Identity details
Firstly, we retrieve the required details about the managed Identity we created earlier.
					#Run the settings script
. .\Settings.ps1

# Step 1: Get the details about the existing managed identity
Write-Host "`nRetrieving the managed identity '${identityName}'."
$identity = az identity show `
        --name $identityName `
        --resource-group $rgname `
        --output json | ConvertFrom-Json

$identityId = $identity.id
$principalId = $identity.principalId
$clientId = $identity.clientId
Write-Host "Managed identity retrieved"
Write-Host "id: ${identityId}"
Write-Host "PrincipalId: ${principalId}"
Write-Host "ClientId: ${clientId}"
Step #2 – Create the Linux App Service Plan
The next step involves creating a Linux-based App Service Plan, which is required to host and run our App Services. In this part, we don’t do anything unusual.
					Write-Host "`nCreating the Linux App Service Plan"
$servicePlan = az appservice plan create `
    --name $AppServicePlan_linux `
    --resource-group $rgname `
    --is-linux `
    --sku $AppServicePlanSKU_Linux `
    --output json | ConvertFrom-Json

$servicePlanId = $servicePlan.id
Write-Host "App Service Plan created with id: ${servicePlanId}"
Step #3 – Create the container App Service
The next step is to create the container-based App Service to run on the previously created App Service Plan.
					$imagePath = "${acrname}.azurecr.io/${imagename}:latest"
Write-Host "`n`nCreating the container App Service."
Write-Host "With the following image ${imagePath}"
$AppService = az webapp create `
    --name $AppServiceName_container_linux `
    --acr-use-identity `
    --plan $AppServicePlan_linux `
    --resource-group $rgname `
    --container-image-name $imagePath `
    --assign-identity $identityId `
    --output json | ConvertFrom-Json

$hostName = $AppService.defaultHostName
$appServiceID = $AppService.id
Write-Host "App Service created, id: ${appServiceID}"
- We set the acr-use-identity flag to indicate that we want to pull the image from Azure Container Registry using a managed identity.
- We assign our managed identity to the service using the assign-identity flag.

In the logs, you may encounter various image pull failures, such as the following:
					WARN  - Image pull failed. Defaulting to local copy if present.
ERROR - Image pull failed: Verify docker image configuration and credentials (if using private repository)
INFO  - Stopping site myapp-linux-container-dev because it failed during startup.
ERROR - DockerApiException: Docker API responded with status code=InternalServerError,
 response={"message":"Head \"https://tncontaineregistry.azurecr.io/v2/mycontainerimage/manifests/latest\":
 unauthorized: authentication required, visit https://aka.ms/acr/authorization for more information."}
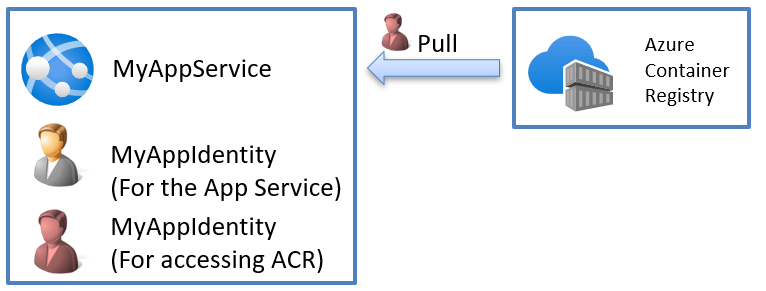
The Azure App Service setup so far
So far, we have this setup:
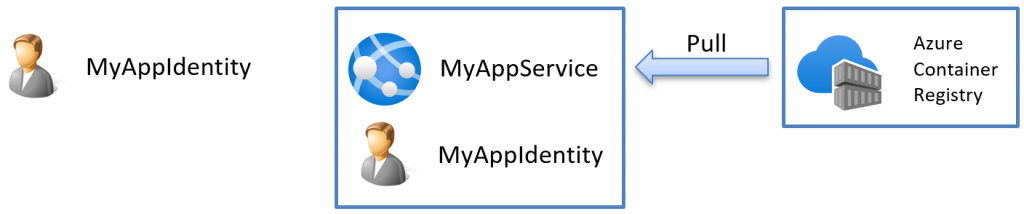
The service has a user-assigned managed identity (found under Settings->Identity). This means we created the user and then assigned that user to the app service. The user’s lifetime is independent of the app service itself, and the identity might be associated with multiple Azure services.

Under Deployment -> Deployment Center, we see the following:
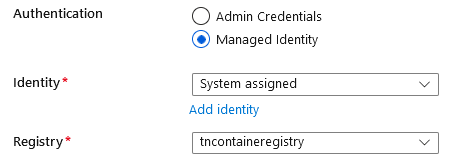
So, it correctly understands that we want to use managed identity, which is good! But the identity is wrong! The identity here should be set to this:
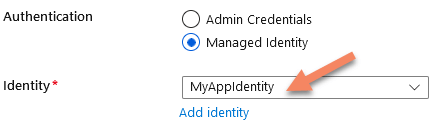
Wait, what? Do we have two different identities in our App Service?
Yes, the hidden truth is that we have two different identities to deal with and we need to specify both identities to get this to work as the image below shows:
Step #4 – Setting the ACR identity
Here comes the most challenging part: How do we set this second identity using Azure CLI? There are various methods to accomplish this.
If you consult the documentation, you may come across several solutions, such as this one:
az resource update --ids $Webapp_Config --set properties.AcrUserManagedIdentityID=$ClientID
Or this one here:
az webapp config set --resource-group <group-name> --name <app-name> --generic-configurations '{"acrUserManagedIdentityID": "<client-id>"}'
Neither will, however, work! What is the solution?
For the first example, the location of the setting seems to have changed. A working solution is:
					$property = "properties.siteConfig.AcrUserManagedIdentityID=${ClientID}"
$tmp = az resource update `
    --ids $appServiceID `
    --set $property `
    --output json | ConvertFrom-Json
					$data="{\""acrUserManagedIdentityID\"": \""${clientId}\""}"
$tmp = az webapp config set `
    --resource-group $rgname `
    --name $AppServiceName_container_linux `
    --generic-configurations $data `
    --output json | ConvertFrom-Json
The solution here is that you need to double-encode the JSON due to an issue in PowerShell. You can find more information about it here, here, and here.
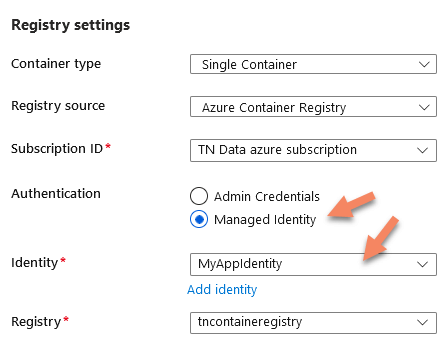
Step #5 – Verify the ACR identity
To ensure that it is setup correctly, we can query the App Service configuration using:
					$settings = az webapp config show `
    --resource-group $rgname `
    --name $AppServiceName_container_linux `
    --output json | ConvertFrom-Json
Write-Host "`nThese two settings must be set for successful ACR pull:"
Write-Host "acrUseManagedIdentityCreds='$($settings.acrUseManagedIdentityCreds)'"
Write-Host "acrUserManagedIdentityID='$($settings.acrUserManagedIdentityId)'"
The acrUseManagedIdentityCreds should be set to true and the acrUserManagedIdentityID should contain the GUID for your managed identity.
You can also verify this in the portal under App Service -> Deployment- > Deployment center:
Step #6 – Enable Application Logging (Filesystem)
To help with debugging our container, we can enable both the application and container logs to be sent to the filesystem using:
					$tmp = az webapp log config `
      --name $AppServiceName_container_linux `
      --resource-group $rgname `
      --application-logging filesystem `
      --docker-container-logging filesystem `
      --level verbose `
      --output json | ConvertFrom-Json
Step #7 – Enable log streaming (optional)
Adding the following command at the end of an Azure deployment script enables real-time monitoring of application logs to start after the script is completed. This allows for immediate detection and troubleshooting of any issues during deployment. This is useful for local debugging!
					# Optionally enable this to run log stream for debugging purposes
az webapp log tail `
        --name $AppServiceName_container_linux `
        --resource-group $rgname
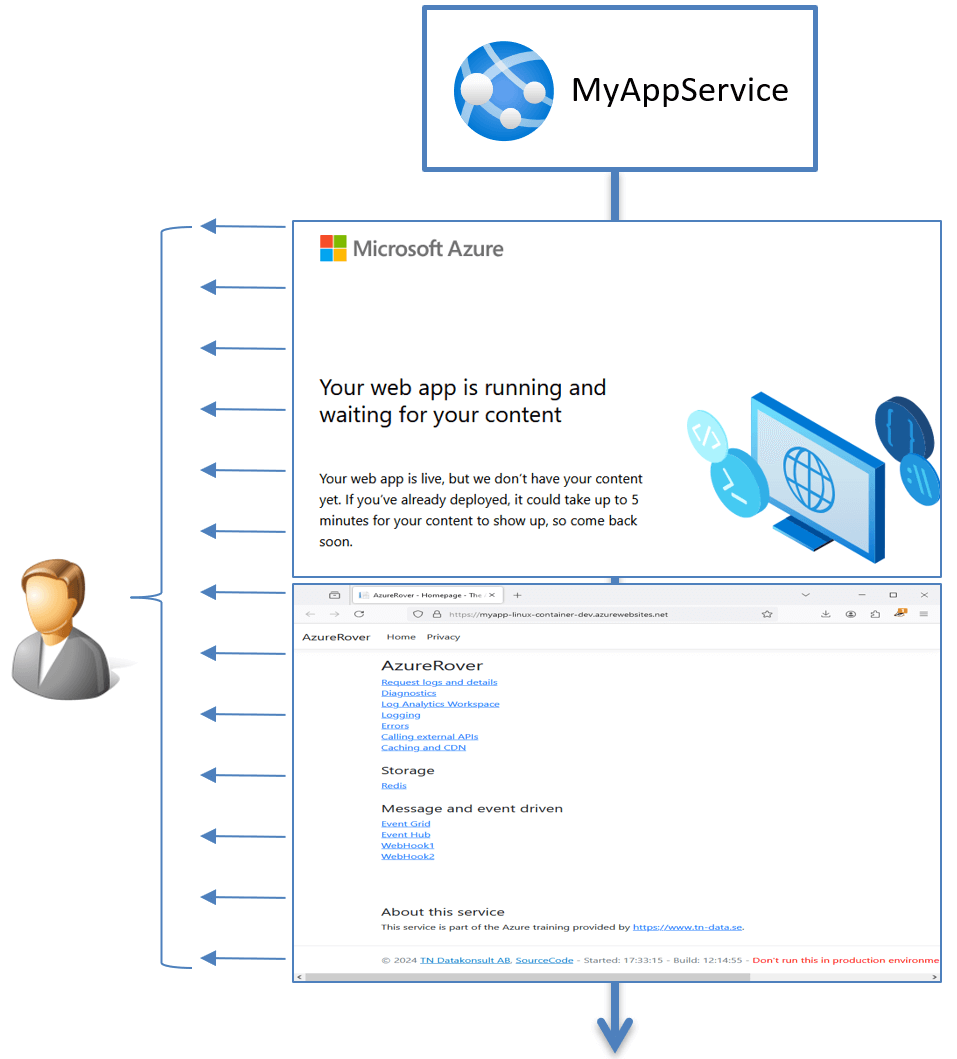
Are we done?
If you run the above script, your container should eventually appear! Great! It works! However, can we improve it?
The current developer experience is not good, because the current experience for the first deployment is like this:
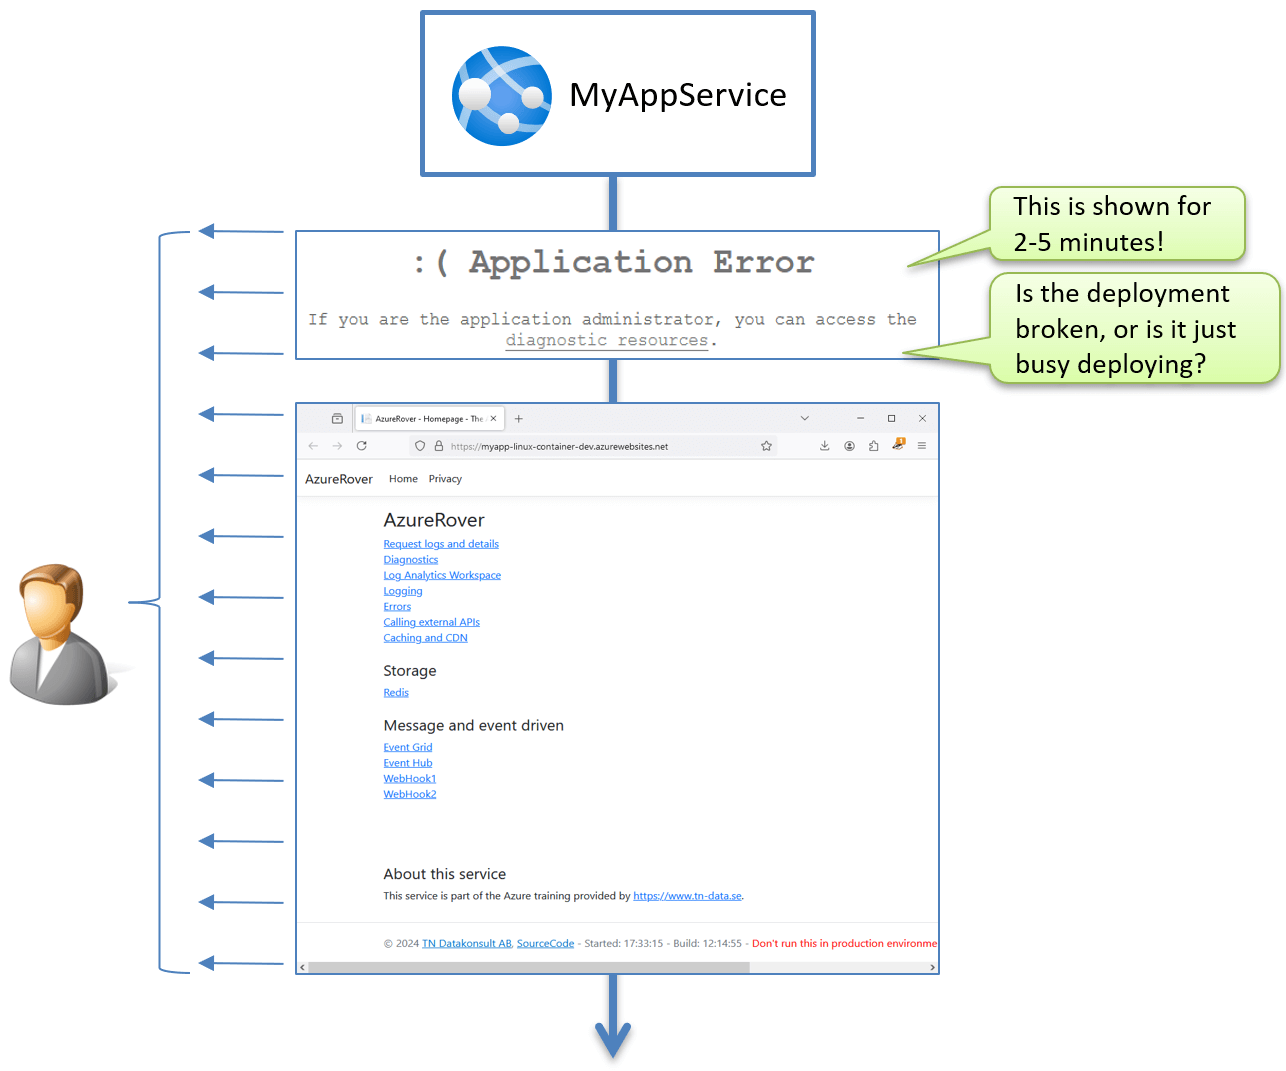
This lack of visibility creates uncertainties such as:
- Is the deployment broken?
- Is my application broken?
- Is something else broken?
- Or is it simply busy with the deployment process?
How can we enhance this experience?
Improving the script
One option that I came up with is to do the following:- First deploy the built-in .NET Core 8 runtime instead of my container.
- Set the ACR Identity as we did above.
- Replace the runtime with my custom container image.
					# Step 3: Create the App Service
Write-Host "`n`nCreating the App Service with the default runtime 'DOTNETCORE:8.0'."
$AppService = az webapp create `
    --name $AppServiceName_container_linux `
    --acr-use-identity `
    --plan $AppServicePlan_linux `
    --resource-group $rgname `
    --runtime 'DOTNETCORE:8.0' `
    --assign-identity $identityId `
        --output json | ConvertFrom-Json
$hostName = $AppService.defaultHostName
$appServiceID = $AppService.id
Write-Host "App Service created, id: ${appServiceID}"
					$imagePath = "${acrname}.azurecr.io/${imagename}:latest"
Write-Host "`n`nChange the service to use the container ${imagePath}."
az webapp config container set `
  --name $AppServiceName_container_linux `
  --resource-group $rgname `
  --container-image-name $imagePath `
  --output json | ConvertFrom-Json
Tips and tricks
In your logs, you might find the Kudulite logo displayed when the service starts up, like this:
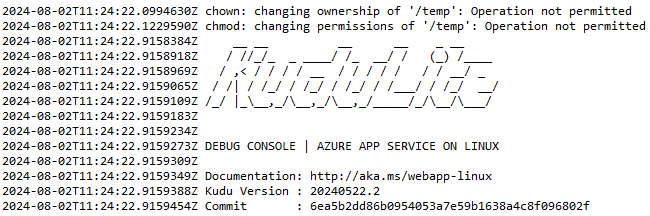
How can you do that yourself?
To generate a logo, visit this site and create your own logo. Then I simply print it out to the console in start startup, like this:
					Log.Information("AzureRover starting up");
Log.Information("");
Log.Information(@"       _____                             __________                          ");
Log.Information(@"      /  _  \ __________ _________   ____\______   \ _______  __ ___________ ");
Log.Information(@"     /  /_\  \\___   /  |  \_  __ \_/ __ \|       _//  _ \  \/ // __ \_  __ \");
Log.Information(@"    /    |    \/    /|  |  /|  | \/\  ___/|    |   (  <_> )   /\  ___/|  | \/");
Log.Information(@"    \____|__  /_____ \____/ |__|    \___  >____|_  /\____/ \_/  \___  >__|   ");
Log.Information(@"            \/      \/                  \/       \/                 \/       ");
Log.Information("");

Isn’t this a useful thing to have? Don’t you agree? (AzureRover is just the name of an internal project)
Summary and the scripts
Getting this to work was a painful experience and hopefully, this post can help others to have a much smoother process.The complete scripts can be found here
A separate blog post will cover how this can be slightly simplified using a system-assigned managed identity.