IdentityServer - IdentityResource vs. ApiResource vs. ApiScope
Understanding the differences between IdentityResource, ApiResource, and ApiScope in Duende IdentityServer is a common question among developers, often seen on platforms like Stack Overflow.
My answer to this question has gained significant traction as one of my most upvoted responses. In this blog post, I’ll dive deeper into these resource types, explaining what they are, how they function, and their impact on your IdentityServer setup.
Back to basics
In IdentityServer, there are three types of resources
- IdentityResources
- ApiScopes
- ApiResources
How are these related, and what do they control?
Before we can answer this, we need to take one step back and talk about scopes.
**Scopes in OpenID Connect
**
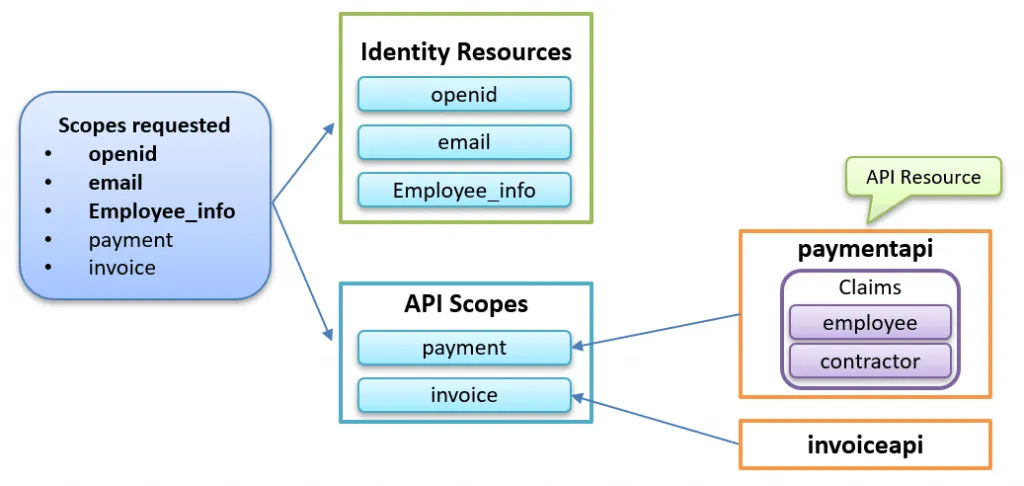
When the client application authenticates, it will ask Duende IdentityServer for a set of scopes, as the picture below shows:
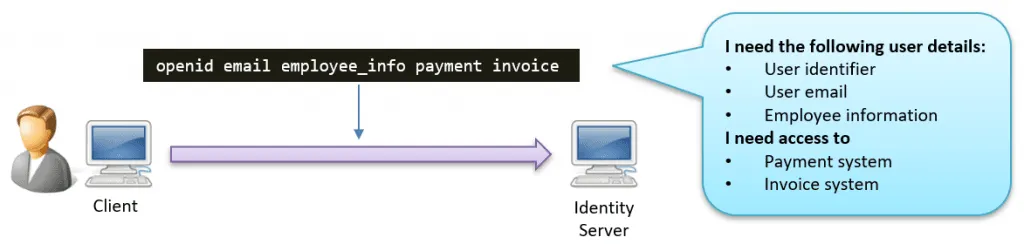
The list of scopes represents a mixed list of what the client wants to get back. So far, so good!
As the picture shows above, we can divide the list of scopes into two categories:
-
**Identity scopes
**Scopes that are all about what information the client wants to know about the user -
**Access scopes
**Scopes that represent what the client wants to have access to.
These two categories control what goes into the id and access token.

Identity Scopes
The Identity scopes control what goes into the ID token (or is available from the UserInfo endpoint). In IdentityServer, we define these scopes using IdentityResources.
The three identity scopes in our example above can, in code, be defined as follows:
_identityResources = new List<IdentityResource>()
{
    new IdentityResources.OpenId(),
    new IdentityResources.Email(),
    employeeInfoScope
};

var employeeInfoScope = new IdentityResource()
{
    Name = "employee_info",
    DisplayName = "Employee information",
    Description = "Employee information including seniority and status...",
};
In the code above, we define that clients can ask for the standardized openid and email scope and a custom scope named employee_info.
The employee_info scope, as defined above, is pretty useless. We also typically want to add what claims this scope represents.
The following picture shows how the identity resources are connected to a set of claims:

The list of requested claims represents what claims will end up in the ID token. Don’t forget that only the claims found in the user database will be included.
In code, this means that we will add a list of user claims to our custom scope:
var employeeInfoScope = new IdentityResource()
{
    Name = "employee_info",
    DisplayName = "Employee information",
    Description = "Employee information including seniority and status...",
    UserClaims = new List<string>
    {
        "employment_start",
        "seniority",
        "contractor"
    }
};
Access scopes
The access scopes control what APIs and services the client application wants to access and what should go into the access token. In IdentityServer, we define these scopes using ApiScopes.
In code, we can define them as shown in this example:
_apiScopes = new List<ApiScope>()
{
    new ApiScope()
    {
        Name = "payment",
        DisplayName = "Payments access",
        Description = "Access to the payment related services.",
        UserClaims = new List<string>
        {
            //These claims will be added to the access token, not the ID-token!
            "bonuslevel",
            "sendpayments"
        }
    },

    new ApiScope()
    {
        Name = "invoice",
        DisplayName = "Invoices access",
        UserClaims = new List<string>
        {
            "approveinvoices",
            "sendinvoices"
        }
    }
};
The image below shows how the APIScopes and user claims are related based on the code above:
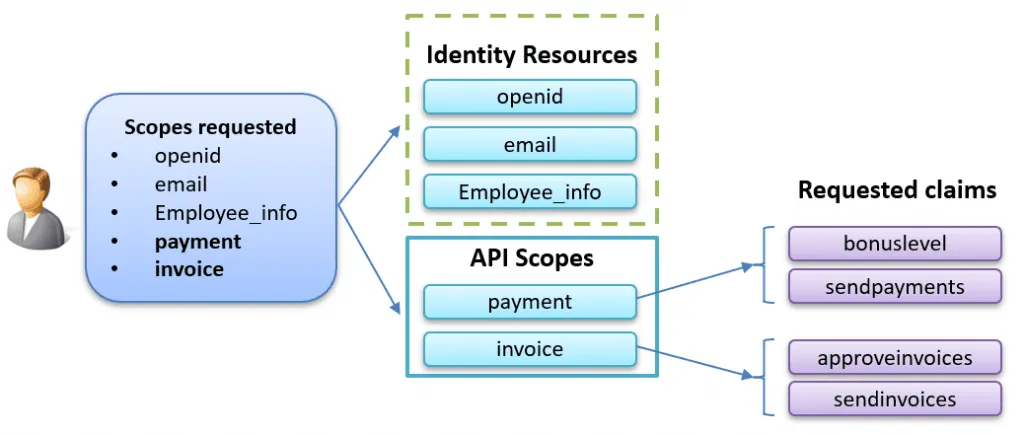
The requested claims will be added to the access token, not the id token. These claims are useful when, for example, services and APIs need to authorize received access tokens.
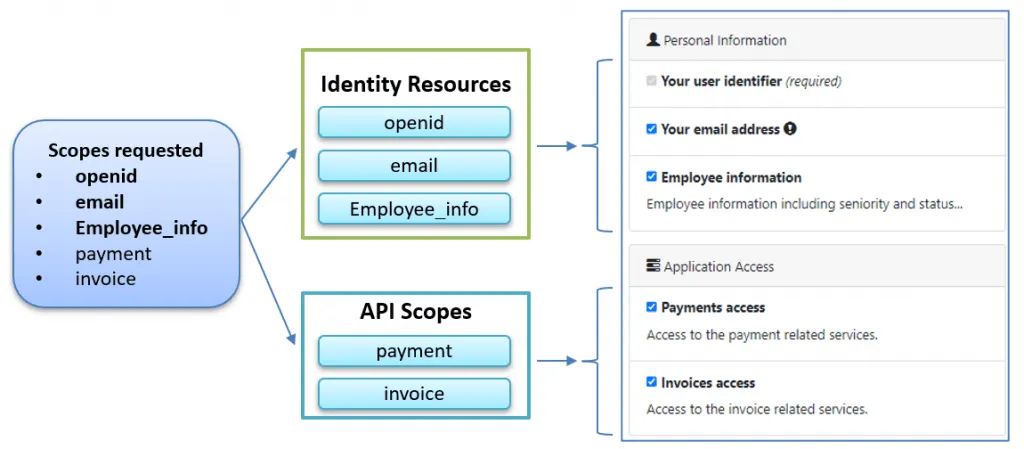
Also, it is important to note that the requested scopes (IdentityResources and ApiScopes) are what the user will give consent to during authentication:
**API Resources in IdentityServer
**
Defining IdentityResources and ApiScopes is a good start, but we can improve our setup by introducing API Resources.
One problem with the current setup is that the aud claim inside the access token contains a generic value:
{
"iss": "https://identity.secure.nu:6001",
"aud": "https://identity.secure.nu:6001/resources",
"scope": [
  "openid",
  "email",
  "employee_info",
  "payment",
  "invoice"
],
If we set the EmitStaticAudienceClaim setting to false in IdentityServer:
builder.Services.AddIdentityServer(options =>
{
    options.EmitStaticAudienceClaim = false;
})
Then the aud claim is not even included:
{
"iss": "https://identity.secure.nu:6001",
"scope": [
  "openid",
  "email",
  "employee_info",
  "payment",
  "invoice"
],
...
The access tokens above are a bit too generic, and we often want a more “targeted” access token. That allows the intended service receiving the token to verify that the service is the intended target for the token.
Introducing IdentityServer API Resources
By introducing APIResources, we can control what goes into the audience (aud) claim and further improve our setup. For example, we can define two ApiResources as follows:
var paymentApi = new ApiResource()
{
    Name = "paymentapi",
    Scopes = new List<string> { "payment" },
    UserClaims =
    {
        //Custom user claims that should be provided when requesting access to this API.
        //These claims will be added to the access token, not the ID token!
        "employee",
        "contractor"
    }
};

var invoiceApi = new ApiResource()
{
    Name = "invoiceapi",
    Scopes = new List<string> { "invoice" },
};

_apiResources = new List<ApiResource>()
{
    paymentApi,
    invoiceApi,
};
The image below shows the relationship between the ApiScopes and ApiResources as defined in the code above:
When adding these two APIResources, the access token will now contain the following:
{
  "iss": "https://identity.secure.nu:6001",
  "aud": [
    "paymentapi",
    "invoiceapi"
  ],
  "scope": [
    "openid",
    "email",
    "employee_info",
    "payment",
    "invoice"
  ],
  "contractor": "no",
  "employee": "yes",
  "approveinvoices": "no",
  "sendinvoices": "yes",
  "sendpayments": "yes",
  "bonuslevel": "42",
...
The API can verify if it is the intended target by checking the aud claim inside the received access tokens. In addition, the use claims defined in the ApiScopes and ApiResources are also included in the access token.
As described in the Duende IdentityServer documentation, adding ApiResources gives you these additional benefits:
- support for the JWT aud claim. The value(s) of the audience claim will be the name of the ApiResource(s)
- support for adding common user claims across all contained scopes
- support for introspection by assigning an API secret to the resource
- support for configuring the access token signing algorithm for the resource
Resources
- OpenID Connect for Developers
- IdentityServer resource documentation
- Authorization based on Scopes
- API Resources
- ApiResource vs ApiScope vs IdentityResource on Stack Overflow
More posts by the author
- Debugging OpenID Connect claim problems in ASP.NET Core
- Debugging JwtBearer Claim Problems in ASP.NET Core
- Improving ASP.NET Core Security By Putting Your Cookies On A Diet
- IdentityServer in Docker – Part 1
Related Training Workshops
Feedback, comments, found any bugs?
If you have any feedback or questions on this blog post or would like to get in touch, you can find my contact details here.