In this third part of the series, we tackle login issues in IdentityServer caused by cookie restrictions in HTTP and show how to resolve them by implementing HTTPS. We’ll guide you through securing communication between the host, client, and IdentityServer containers and configuring HTTPS in Docker to ensure everything runs smoothly.
This blog has been broken up into four separate posts:
- IdentityServer in Docker Containers: Adding Containers (Part 1)
- IdentityServer in Docker Containers: Networking (Part 2)
- IdentityServer in Docker Containers: HTTPS and SameSite (Part 3)
- IdentityServer in Docker Containers: Handle Logout (Part 4)
If you want to view the final solution, the code for each step and the final code can be found on GitHub here.
Solving The IdentityServer Login Form Issue (Attempt #7)
Picking up from where we left off, we’ve successfully set up the containers and established communication between them. Next, we turn to user login issues that can arise if we’re not careful! The login form isn’t working when using bob/bob to authenticate. Why is that? Let’s investigate further.
For this example, we’ll use the Chrome browser. Press F12 to open the browser developer console, then navigate to the Network tab.
Try logging in as bob/bob again, and look for the request made to the login URL. Once located, click on the Cookies tab.

Under the Cookies tab, if you enable the option Show filtered out request cookies, you’ll notice several cookies highlighted in yellow. These cookies are rejected or not included in the request. Hover over the info icon next to each cookie to find out why.

The core issue is that we’re using HTTP. Many crucial cookies are blocked due to the SameSite and Secure attributes. These cookies are essential for ASP.NET Core’s CSRF protection, IdentityServer, and the OpenID Connect authentication handler. There is no way around this!
To resolve this, we must use HTTPS for browser-based interactions. The back-channel communication, however, can continue to use HTTP since no cookies are involved in those requests.
For more details about troubleshooting cookie problems, check out my blog post: Debugging Cookie Problems in ASP.NET Core
Why did we start with HTTP? Beginning with HTTP simplifies the initial setup of the containers and ensures that we can quickly establish communication between them. Once everything works correctly with HTTP, it’s easier to transition to the more secure HTTPS configuration.
So, how do we implement this? We’ll address that in the next attempt.
Adding HTTPS to IdentityServer and Client (Attempt #8)
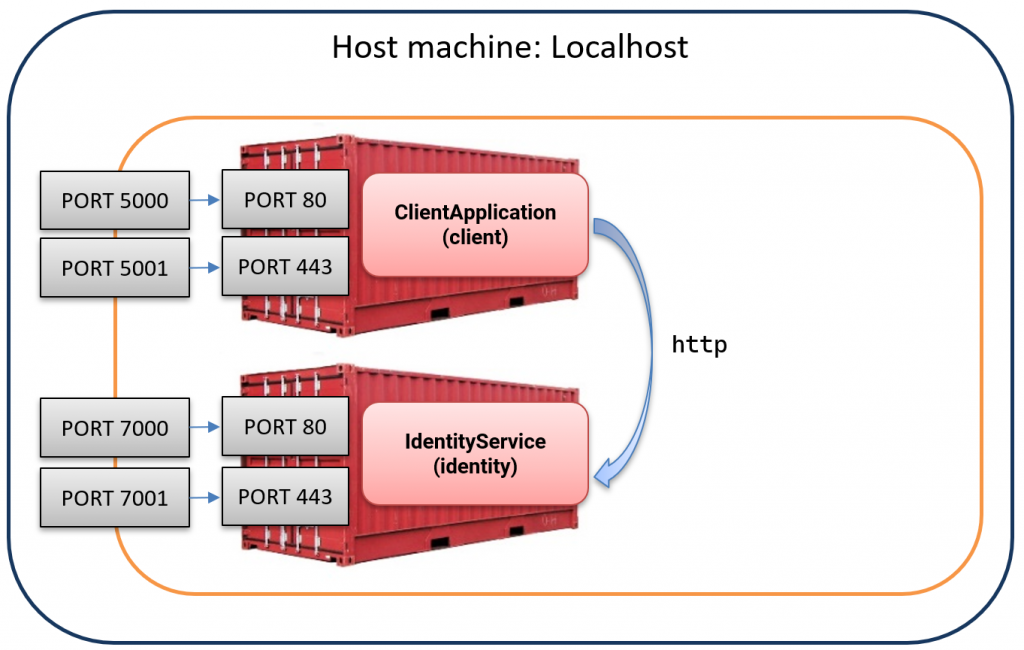
To resolve the cookie issue, we need our application’s client and IdentityService to support HTTPS while keeping HTTP for back-channel communication. This requires exposing port 443 and adding separate port mappings, as shown below:

We begin by updating the two Dockerfiles to expose port 443 and configuring ASP.NET Core to listen on ports 80 and 443. This is done by adding or updating the following lines in each file:
EXPOSE 80 443
ENV ASPNETCORE_URLS=http://+:80;https://+:443
Next, we modify the docker-compose.yml file and map the two HTTPS ports:
					services:
  client:
    build:
      context: .
      dockerfile: Dockerfile_Client
    ports:
      - "5000:80"
      - "5001:443"
    depends_on:
      - identity

  identity:
    build:
      context: .
      dockerfile: Dockerfile_Identity
    ports:
      - "7000:80"
      - "7001:443"
					}).AddOpenIdConnect(options =>
{
    options.Authority = "https://localhost:7001";
    options.MetadataAddress = "http://identity:80/.well-known/openid-configuration";

    ...
    options.Events.OnRedirectToIdentityProvider = context =>
    {
        context.ProtocolMessage.IssuerAddress = "https://localhost:7001/connect/authorize";
        return Task.CompletedTask;
    };
});
System.InvalidOperationException: Unable to configure HTTPS endpoint. No server certificate was specified, and the default developer certificate could not be found or is out of date.
If this exception doesn’t appear in the logs, consider adjusting the log levels in appsettings.json for more detailed error messages.
Why does this error occur?
This error happens because the application cannot find a valid HTTPS certificate. ASP.NET Core expects a trusted certificate to configure HTTPS endpoints, but it isn’t available. We will resolve this issue by setting up the required certificate in the next attempt.
Adding the certificate to IdentityServer / Client (Attempt #9)
To enable HTTPS, we need to add a TLS certificate to each container. But where do we get such a certificate? We could create a self-signed certificate or use a paid trusted certificate.
However, since this setup is only for local development and we want to keep using the localhost domain, the simplest solution is to use the existing developer certificate that we installed and trusted when setting up ASP.NET Core and Visual Studio.

Run the following command to check if you have a valid development certificate installed:
> dotnet dev-certs https
A valid HTTPS certificate is already present.
For more information, refer to the official dotnet dev-certs documentation
We then run the following command to export the certificate from the Windows certificate store to a separate file.
> dotnet dev-certs https --export-path ./aspnetcore-dev-cert.pfx --password MyPw123 --format PFX
This command will create a file named aspnetcore-dev-cert.pfx at the root of your project directory. In a real-world scenario, storing this file outside the repository is best to avoid accidental commits. As a best practice, ensure that .pfx files are included in your .gitignore file.
Next, we need to import the certificate into both containers. This is done by mounting the certificate file as a volume in each container. Modify the docker-compose.yml file as follows:
					services:
  client:
    build:
      context: .
      dockerfile: Dockerfile_Client
    ports:
      - "5000:80"
      - "5001:443"
    depends_on:
      - identity
    volumes:
      - ./aspnetcore-dev-cert.pfx:/app/aspnetcore-dev-cert.pfx

  identity:
    build:
      context: .
      dockerfile: Dockerfile_Identity
    ports:
      - "7000:80"
      - "7001:443"
    volumes:
      - ./aspnetcore-dev-cert.pfx:/app/aspnetcore-dev-cert.pfx
For more details on setting up HTTPS with Docker Compose, check out the guide on Hosting ASP.NET Core images with Docker Compose over HTTPS
⚠️ Security Warning
This approach works and is used here for simplicity and demonstration purposes. For a more secure setup, store the certificate outside the project folder or inject it from a trusted key vault at runtime.
Upskill With Me: Courses, Workshops & Training

Next, we need to configure ASP.NET Core to use this certificate by setting its path and password as environment variables in the compose.yml file:
					services:
  client:
    build:
      context: .
      dockerfile: Dockerfile_Client
    ports:
      - "5000:80"
      - "5001:443"
    depends_on:
      - identity
    volumes:
      - ./aspnetcore-dev-cert.pfx:/app/aspnetcore-dev-cert.pfx
    environment:
      - ASPNETCORE_Kestrel__Certificates__Default__Path=/app/aspnetcore-dev-cert.pfx
      - ASPNETCORE_Kestrel__Certificates__Default__Password=MyPw123

  identity:
    build:
      context: .
      dockerfile: Dockerfile_Identity
    ports:
      - "7000:80"
      - "7001:443"
    volumes:
      - ./aspnetcore-dev-cert.pfx:/app/aspnetcore-dev-cert.pfx
    environment:
      - ASPNETCORE_Kestrel__Certificates__Default__Path=/app/aspnetcore-dev-cert.pfx
      - ASPNETCORE_Kestrel__Certificates__Default__Password=MyPw123
With these steps completed, we have successfully mounted the certificate into each container and configured ASP.NET Core to use it. This allows us to access the services over HTTPS using the following URLs:
- https://localhost:5001/ for the client
- https://localhost:7001/ for the identity service
Awesome! 🥳
What’s next
We’ve resolved the login issues using HTTPS and secured the communication between the host and containers. In the final post, we’ll address the sign-out challenges and wrap up the key lessons from this series. Stay tuned!
About the author
Hey! I’m Tore. I’m an independent consultant, trainer, and coach helping developers with authentication, authorization, and modern application security. I work with teams to build secure, scalable, and observable applications, specializing in Duende IdentityServer, OpenID Connect, and OAuth.
Interested in training, consulting, or an extra pair of hands to strengthen your web security skills or projects? Learn more about my training and consulting services.


