Duende IdentityServer is the leading OpenID Connect and OAuth 2 server for .NET. In this tutorial, I’ll walk you through setting up Duende IdentityServer 7.4.4 from scratch using ASP.NET Core 10.
What you’ll learn:
- How to add and configure the IdentityServer middleware
- How to integrate the sample user interface for login and logout
- How to set up test users and in-memory configuration
- How the request pipeline and middleware order work together
- How to configure Serilog for comprehensive logging
My Personal IdentityServer Journey
My deep dive into IdentityServer started when customers began asking about OpenID Connect and authentication. I’ll be honest: these topics intimidated me at first. But I live by a simple motto: the things you’re scared of, you should do more often.
So I decided to crack the code.
I immersed myself in the material, created training workshops, and forced myself to really understand how everything worked. To cement my learning, I started answering questions on Stack Overflow and presenting at conferences and user groups.
New to OpenID-Connect?
Before diving into Duende IdentityServer, I highly recommend familiarizing yourself with OpenID Connect and OAuth first. IdentityServer builds on these protocols, and understanding concepts such as tokens, scopes, claims, and flows will make this tutorial much easier to follow.
To get started, check out my OpenID Connect for Developers tutorial, which provides an in-depth introduction tailored for developers.
Starting from Scratch
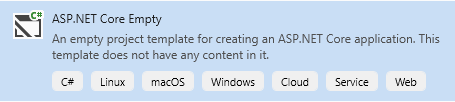
In this tutorial, we’ll start with the ASP.NET Core Empty project template and build a working Duende IdentityServer setup, step by step.
By starting from scratch, you’ll understand exactly what each component does, why it’s needed, and how everything fits together.
Why Build from Scratch?
Duende provides a set of excellent templates that get you up and running quickly, including:
- Duende BFF Host using a Remote API
- Duende BFF using a Local API
- Duende BFF with Blazor autorender
- Duende IdentityServer Empty
- Duende IdentityServer Quickstart UI (UI assets only)
- Duende IdentityServer with ASP.NET Core Identity
- Duende IdentityServer with Entity Framework Stores
- Duende IdentityServer with In-Memory Stores and Test Users
These templates are great for getting started. However, they come with many defaults and preconfigured code that can feel like magic. When something goes wrong or you need to customize the behavior, that magic becomes a problem.
I believe you should understand everything you bring into your IdentityServer project. That’s why we’ll build our service from scratch, copying only the files and configuration that we need from the template.
By the end, you’ll have something similar to the Duende IdentityServer with In-Memory Stores and Test Users template, with one key difference: you’ll understand exactly how everything is put together.
Step #1: Creating the IdentityService Project
Let’s get started by creating a new Empty ASP.NET Core project in Visual Studio 2026.
Use the following settings:
- Project name: IdentityService
- Framework: .NET 10
- Configure for HTTPS: Yes
- Application URL: Use the .dev.localhost TLD
We won’t enable Docker container support or Aspire orchestration for this project.
STEP #2: Setting the Port and Removing the HTTP Profile
By default, ASP.NET Core assigns random ports when you create a new project. I always use port 6001 for my IdentityServer instances, so I’ll configure that now for this project.
I also removed the HTTP profile and HTTP application URL. Since this is a local development identity service, we only need HTTPS.
Note: If you plan to containerize IdentityServer, you may want to keep HTTP support for internal container-to-container communication. For more details, check out my blog post IdentityServer in Docker Containers.
After these changes, your launchSettings.json file should look like this:
					{
  "profiles": {
    "https": {
      "commandName": "Project",
      "launchBrowser": true,
      "environmentVariables": {
        "ASPNETCORE_ENVIRONMENT": "Development"
      },
      "dotnetRunMessages": true,
      "applicationUrl": "https://identityservice.dev.localhost:6001"
    }
  },
  "$schema": "https://json.schemastore.org/launchsettings.json"
}
STEP #3: Adding the NuGet Packages
Next, we add the following NuGet packages to the project:
- Duende.IdentityServer
The core IdentityServer library that provides OpenID Connect and OAuth 2.0 server functionality. - Duende.IdentityModel
A helper library for working with claims-based identity, OAuth 2.0, and OpenID Connect. It provides types, helpers, and constants for common protocol operations.
See the documentation for details. - Serilog.AspNetCore
Serilog enables structured logging from the start, making it much easier to diagnose issues during development and transition to production logging later.
STEP #4: Configuring Logging
Next, we configure Serilog to get full logging coverage of our application.
First, we create a bootstrap logger:
					Log.Logger = new LoggerConfiguration()
    .MinimumLevel.Information()
    .Enrich.FromLogContext()
    .WriteTo.Console(formatProvider: CultureInfo.InvariantCulture)
    .CreateBootstrapLogger();
This bootstrap configuration ensures Serilog is active from the very beginning, reliably capturing any configuration errors or exceptions during the initial setup phase before the full ASP.NET Core host pipeline is constructed.
The bootstrap logger alone is not enough. We also need to integrate Serilog into ASP.NET Core properly.
To do this, we:
- Wrap the ASP.NET Core startup in a try/catch/finally block to catch fatal exceptions and properly close and flush the logs on exit, ensuring no log statements are lost.
- Configure the ASP.NET Core logging service to use Serilog.
- Add the Serilog request logger to the request pipeline.
Here’s the complete code that implements all three steps:
					try
{
    Log.Information("Starting host...");

    var builder = WebApplication.CreateBuilder(args);

    builder.Services.AddSerilog((services, lc) =>
    {
        lc.MinimumLevel.Information()
          .MinimumLevel.Override("Microsoft", LogEventLevel.Warning)
          .MinimumLevel.Override("Microsoft.AspNetCore", LogEventLevel.Warning)
          .MinimumLevel.Override("System", LogEventLevel.Warning)
          .MinimumLevel.Override("Duende", LogEventLevel.Debug)
          .ReadFrom.Services(services)
          .Enrich.FromLogContext()
          .WriteTo.Console();
    });

    var app = builder.Build();

    app.UseSerilogRequestLogging();

    app.MapGet("/", () => "Hello World!");

    app.Run();
}
catch (Exception ex) when (ex is not HostAbortedException)
{
    Log.Fatal(ex, "Unhandled exception");
}
finally
{
    Log.Information("Shut down complete");
    Log.CloseAndFlush();
}
For more details about configuring Serilog for ASP.NET Core, visit the Serilog.AspNetCore GitHub page.
AddSerilog vs. UseSerilog: What’s the Difference?
In the code above, we used the AddSerilog method. However, you might encounter the UseSerilog method in other samples and tutorials.
What’s the difference between AddSerilog and UseSerilog?
There is no difference. If you look at the source code for UseSerilog, you’ll see that it internally calls AddSerilog. However, you should use AddSerilog, as it is the official public API intended for configuring Serilog in modern .NET applications.
STEP #5: Adding Duende IdentityServer
We added the IdentityServer NuGet package to our project earlier. Now it’s time to add it to our application.
First, we register IdentityServer with the dependency injection container:
					var isBuilder = builder.Services.AddIdentityServer(options =>
{
    options.Events.RaiseErrorEvents = true;
    options.Events.RaiseInformationEvents = true;
    options.Events.RaiseFailureEvents = true;
    options.Events.RaiseSuccessEvents = true;
});
Events in IdentityServer represent significant occurrences within the system, such as successful logins, token issuance, and authentication failures. These events are disabled by default, so we enable them here to capture them in our logs.
Examples of built-in events include:
- ClientAuthenticationSuccessEvent
- ClientAuthenticationFailureEvent
- TokenIssuedSuccessEvent
- TokenIssuedFailureEvent
- UserLoginSuccessEvent
- UserLoginFailureEvent
- And more…
You can read more about events in the Duende IdentityServer documentation.
We also need to add IdentityServer to the request pipeline:
app.UseIdentityServer();
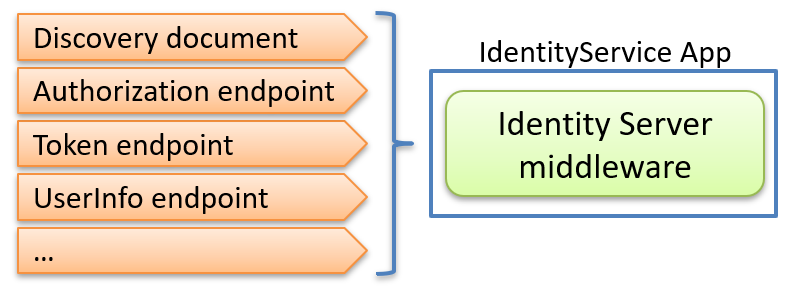
This adds the IdentityServer middleware, which intercepts and responds to requests sent to its endpoints, including the discovery document, authorization endpoint, token endpoint, and others.
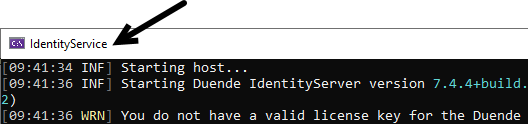
STEP #6: Naming the Console Window
As your solution grows and you add separate projects for clients and APIs, you’ll often run multiple applications at once. With several console windows open, it can be hard to tell which is which.
A simple fix is to set the console title at startup:
Console.Title = "IdentityService";
Add this near the top of Program.cs. It’s a small touch that makes debugging much easier, as shown below:
STEP #7: Adding Authorization
IdentityServer needs the authorization middleware to be present in the request pipeline, so we add it by calling UseAuthorization, as shown below:
					app.UseSerilogRequestLogging();

app.UseIdentityServer();

app.UseAuthorization();

app.MapGet("/", () => "Hello World!");
Note that middleware order matters here. UseAuthorization must come after UseIdentityServer, because the authorization middleware relies on a populated HttpContext.User, which is established by the authentication middleware. UseIdentityServer adds the authentication middleware internally, so you do not need to call UseAuthentication separately.
We also add these two calls to be explicit about what services we register:
					builder.Services.AddAuthentication();
builder.Services.AddAuthorization();
ASP.NET Core will automatically call them for us if we omit them, but I like to always be explicit in my code, so I add them anyway. Being explicit also makes it easier to configure them later if you need to add additional authentication handlers or authorization policies.
With this in place, we will have a request pipeline that looks like this:
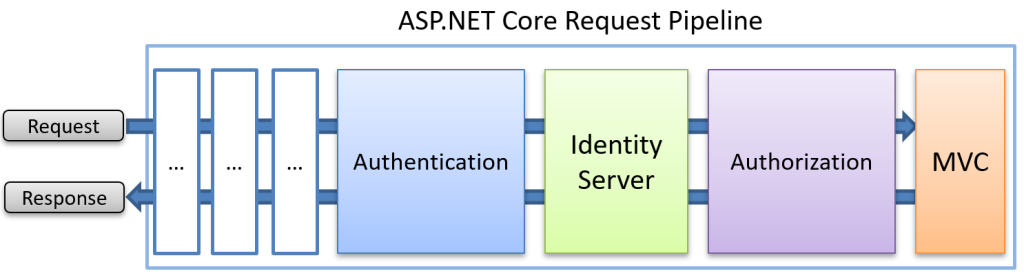
Authentication always occurs first, establishing the user’s identity. Then IdentityServer inspects the request to handle any OAuth 2.0 or OpenID Connect protocol requests. Finally, the authorization middleware checks whether the user has permission to access the requested resource.
What about UseAuthentication?
UseIdentityServer includes a call to UseAuthentication, so it’s not necessary to add it separately.
What does UseIdentityServer do?
Internally, it adds multiple middleware components to the ASP.NET Core request pipeline, including:
- CORS (Cross-Origin Resource Sharing)
- DynamicSchemeAuthentication
- Authentication
- MutualTlsEndpoint
- IdentityServer
Want to learn more about authentication?
My Authentication and Authorization in ASP.NET Core workshop covers how these middleware components work under the hood.
STEP #8: Verifying IdentityServer is Running
That’s it! We have now implemented a working IdentityServer. But how can we tell that it’s actually working? If we start the application, we only see the default “Hello World!” message.
The IdentityServer middleware exposes endpoints for handling OAuth 2.0 and OpenID Connect requests.
We can verify that everything is working by checking the discovery document. Navigate to:
https://identityservice.dev.localhost:6001/.well-known/openid-configuration
If everything is set up correctly, you should see the discovery JSON document.
					{
  "issuer": "https://identityservice.dev.localhost:6001",
  "jwks_uri": "https://identityservice.dev.localhost:6001/.well-known/openid-configuration/jwks",
  "authorization_endpoint": "https://identityservice.dev.localhost:6001/connect/authorize",
  "token_endpoint": "https://identityservice.dev.localhost:6001/connect/token",
  "userinfo_endpoint": "https://identityservice.dev.localhost:6001/connect/userinfo",
  "end_session_endpoint": "https://identityservice.dev.localhost:6001/connect/endsession",
  "check_session_iframe": "https://identityservice.dev.localhost:6001/connect/checksession",
  "revocation_endpoint": "https://identityservice.dev.localhost:6001/connect/revocation",
  "introspection_endpoint": "https://identityservice.dev.localhost:6001/connect/introspect",
  "device_authorization_endpoint": "https://identityservice.dev.localhost:6001/connect/deviceauthorization",
  "backchannel_authentication_endpoint": "https://identityservice.dev.localhost:6001/connect/ciba",
  "pushed_authorization_request_endpoint": "https://identityservice.dev.localhost:6001/connect/par",
  "require_pushed_authorization_requests": false,
  "frontchannel_logout_supported": true,
  "frontchannel_logout_session_supported": true,
  "backchannel_logout_supported": true,
  "backchannel_logout_session_supported": true,
  "scopes_supported": [
    "openid",
    "profile",
    "scope1",
    "scope2",
    "offline_access"
  ...more...
}
What is the Discovery Document?
Most OpenID Connect compliant servers expose a discovery document at the /.well-known/openid-configuration endpoint. This standardized JSON document tells clients everything they need to know about the identity provider, including:
- Issuer
- Authorization endpoint
- Token endpoint
- UserInfo endpoint
- JWKS (signing keys) endpoint
- Supported scopes
- Supported response types
- Supported signing algorithms
- And more…
Instead of hard-coding URLs, clients can discover them at runtime. You can read more about it in the OpenID Connect Discovery 1.0 specification.
The current setup is not particularly useful yet because we’re missing a few things, including configuration, users, and a user interface. We’ll address those next.
STEP #9: Adding the User Interface
So far, we have created our sample project, added logging, and added IdentityServer. We have seen that IdentityServer is responding to requests. Great! But are we done?
No. Right now, we have only added the OpenID Connect endpoints. The key point to understand here is that Duende IdentityServer is just a library that implements OAuth and OpenID Connect. There is no user interface. There is no built-in login or logout page.
This is actually the real power of Duende IdentityServer. By focusing solely on protocol implementation, you follow the single-responsibility principle and have complete freedom to create your own user interface. You can customize the user experience exactly how you want, whether that means matching your company’s branding, adding multi-factor authentication flows, or integrating with external identity providers.
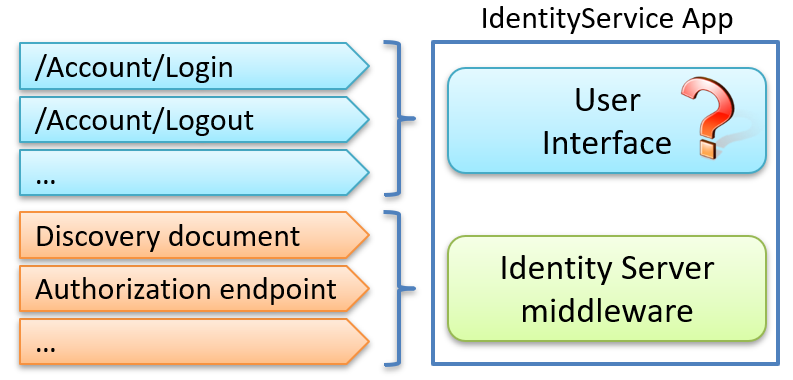
As shown below, a complete IdentityServer setup typically consists of two parts: the protocol endpoints provided by the middleware, and a user interface for login, logout, and consent that you provide yourself.
So how do we implement this? Do we have to build it ourselves?
Luckily, no. Duende provides a sample user interface for us to use. The Duende templates include this UI, but since we’re building our IdentityServer from scratch, we need to add it manually to our project.
We’ll do that next.
STEP #10: Downloading the Duende IdentityServer Source Code
The sample user interface we will use is available in the main IdentityServer GitHub repository. We’ll be copying files from the IdentityServerInMem template.
To download the source code, go to the releases page and download the source code for the version of the Duende IdentityServer NuGet package that you added earlier. I added version 7.4.4, so I downloaded the source code for this release and unzipped it.
Then navigate to \identity-server\templates\src\IdentityServerInMem and copy the Pages and wwwroot folders to your Visual Studio project.
In Solution Explorer, you should now see these two folders:
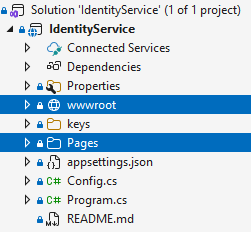
Build your application. The solution should build successfully.
The name ‘Base64Url’ does not exist in the current context
If you encounter the error: “The name ‘Base64Url’ does not exist in the current context”, then replace:
var bytes = Base64Url.Decode(encoded);
with:
var bytes = Base64Url.DecodeFromChars(encoded);
After this change, your application should build successfully.
Why this happens
This is due to a breaking change in Duende.IdentityModel, where the previously deprecated Base64Url.Encode and Base64Url.Decode APIs were removed. The new supported APIs are EncodeToString and DecodeFromChars. For details, see the related pull request.
STEP #11: Adding MVC and Razor Pages Support
The user interface we just added won’t work yet because we haven’t enabled support for ASP.NET Core Razor Pages. To do this, we need to add:
builder.Services.AddRazorPages();
This registers the required services to support Razor Pages in ASP.NET Core.
However, this alone is not enough. We also need to add the endpoint routing middleware to the request pipeline:
app.UseRouting();
(Add this after UseSerilogRequestLogging.)
Finally, replace the existing MapGet with:
					    app.MapRazorPages()
        .RequireAuthorization();
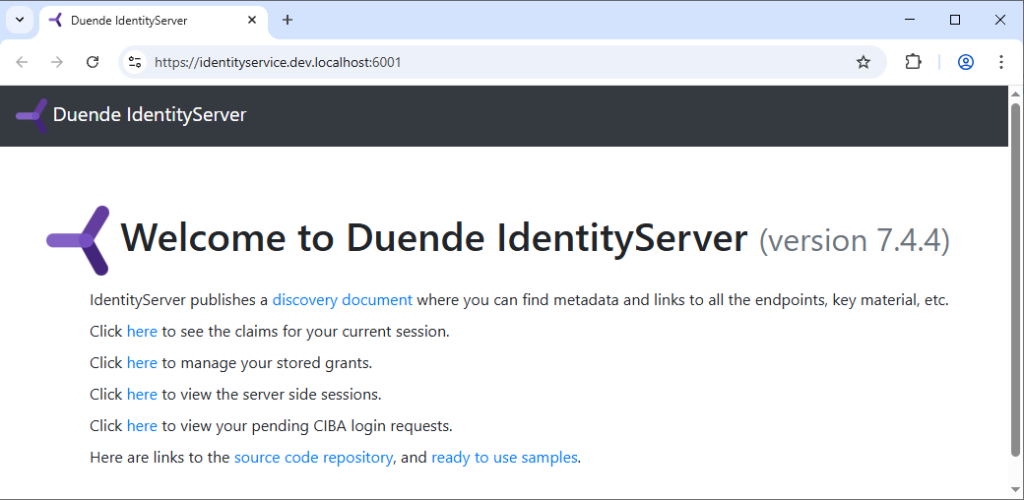
If you run the application now, you should see the Duende IdentityServer welcome page. Awesome!
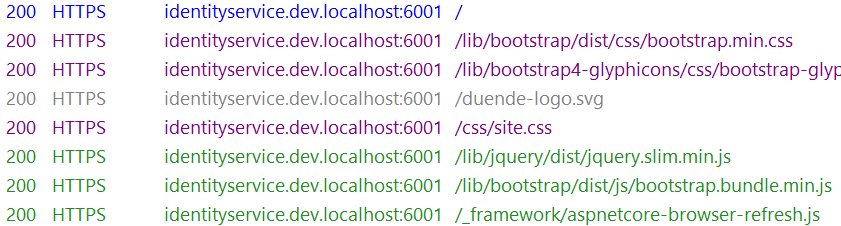
However, you’ll notice that the static content (images, CSS, and JavaScript) is not loading. We’ll fix that next.
STEP #12: Adding Static Content Support
Adding support for static content is easy. We just add this middleware to our request pipeline:
app.UseStaticFiles();
Add it before UseSerilogRequestLogging.
Restart the application, and you should now see the standard Duende IdentityServer welcome page:
STEP #13: Troubleshooting Fiddler with dev.localhost Endpoints
At this point, we have a fully working IdentityServer instance with a user interface, static content, and authentication in place. As you continue developing and integrating clients and APIs, one thing quickly becomes essential: the ability to inspect HTTP traffic.
This is especially important when working with OpenID Connect. Many critical requests, such as token requests, introspection calls, and user info lookups, are back-channel requests that occur entirely server-to-server. These requests never appear in browser developer tools.
For inspecting this traffic, I always use Fiddler Classic, an invaluable debugging tool that you can download for free.
The ERR_TUNNEL_CONNECTION_FAILED error
If you runFiddler and try to browse your IdentityServer running on a .dev.localhost address, you may encounter the ERR_TUNNEL_CONNECTION_FAILED browser error:

This can be confusing, especially since Fiddler and ASP.NET Core have worked well together for many years.
So what changed?
What is the .dev.localhost domain?
The .dev.localhost domain is a new feature introduced in .NET 10 to simplify local HTTPS development. It allows you to use realistic, TLS-secured hostnames without manually managing certificates. You can read more about it in the
Why You Should Be Using .NET 10’s New TLS Certificate Certificate blog post.
The reason for ERR_TUNNEL_CONNECTION_FAILED
You might wonder:
Fiddler and ASP.NET Core have always worked together, so what changed?
The issue lies in how domain names are resolved. Modern browsers (Chrome, Edge, and Firefox) have a built-in rule: they automatically resolve any domain ending in localhost to 127.0.0.1 internally. They don’t even bother asking your operating system where the site is.
Fiddler, however, acts as a system proxy. When your browser sends a request through Fiddler, Fiddler asks the Windows OS to resolve the address. Unlike your browser, Windows has no idea where identityservice.dev.localhost is. You can verify this by trying to ping the address in your terminal:
					C:\>ping identityservice.dev.localhost
Ping request could not find host identityservice.dev.localhost. Please check the name and try again.
The Fix: Updating the Hosts File
To fix this, we need to tell Windows where to find our local development domains. We do this by adding an entry to the hosts file located at C:\Windows\System32\drivers\etc\hosts.
Open this file in a text editor by running it as an Administrator, and add the following line:
127.0.0.1 identityservice.dev.localhost
The hosts file does not support wildcards (like *.dev.localhost), so you will need to add a specific entry for each service you create.
Verifying the Connection
Once you’ve saved the file, try the ping command again. It should now resolve correctly to your local loopback address:
					C:\>ping identityservice.dev.localhost

Pinging identityservice.dev.localhost [127.0.0.1] with 32 bytes of data:
Reply from 127.0.0.1: bytes=32 time<1ms TTL=128
Reply from 127.0.0.1: bytes=32 time<1ms TTL=128
Reply from 127.0.0.1: bytes=32 time<1ms TTL=128
Reply from 127.0.0.1: bytes=32 time<1ms TTL=128
Now, when you run Fiddler and refresh your application, everything should work seamlessly. You will be able to see all your HTTPS traffic, decrypted and ready for inspection!
STEP #14: Adding IdentityServer Users
If we start our application and try to authenticate, perhaps by clicking the “Click here to see the claims for your current session” link (as shown below):
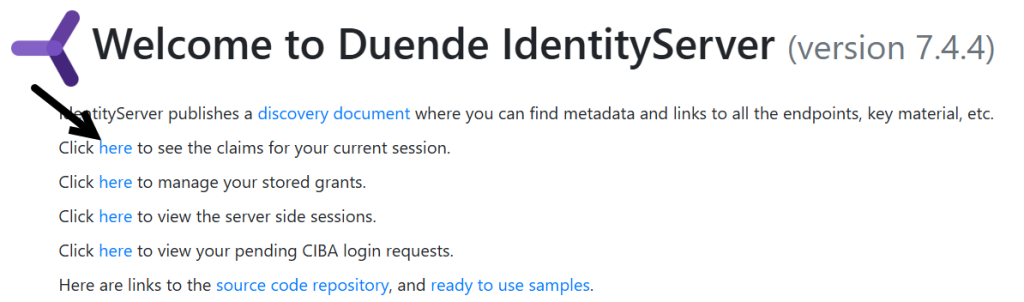
We get this exception:
					System.InvalidOperationException:
'Please call 'AddTestUsers(TestUsers.Users)' on the IIdentityServerBuilder in
Startup or remove the TestUserStore from the AccountController.'
How do we fix this?
Conveniently, a class with sample users is included among the files we added earlier when we added the user interface. Locate the \Pages\TestUsers.cs file and explore its content.
To add these users to IdentityServer, we simply call the AddTestUsers method:
					var isBuilder = builder.Services.AddIdentityServer(options =>
{
    options.Events.RaiseErrorEvents = true;
    options.Events.RaiseInformationEvents = true;
    options.Events.RaiseFailureEvents = true;
    options.Events.RaiseSuccessEvents = true;
}).AddTestUsers(TestUsers.Users);
Restart the application and try to authenticate again. You should now be presented with a login screen. Enter bob as the username and bob as the password, and the login should succeed.
This confirms that our test users work and that we can authenticate using these credentials.
STEP #15: Adding IdentityServer Configuration
An IdentityServer with users is a good start. However, it won’t be very useful if we don’t define the IdentityResources, ApiScopes, and Clients.
A sample configuration file can be found in the in-memory template that we copied files from earlier. Go back to the source code and copy the Config.cs file found in \identity-server\templates\src\IdentityServerInMem\ and add it to the root of your project.
Open this file in Visual Studio and review its contents. You’ll find some sample resources and clients defined.
To add these configuration options to IdentityServer, add the following lines after AddIdentityServer:
					// in-memory, code config
isBuilder.AddInMemoryIdentityResources(Config.IdentityResources);
isBuilder.AddInMemoryApiScopes(Config.ApiScopes);
isBuilder.AddInMemoryClients(Config.Clients);
For more details about these concepts, see my blog post: IdentityServer – IdentityResource vs. ApiResource vs. ApiScope
STEP #16: Exploring the User Interface
When we added the user interface earlier, you might have noticed that it contains quite an extensive set of pages. As a newcomer, this can feel a bit overwhelming.
Let’s clarify the key files and folders in the Pages folder:
Folders:
- Account
Handles user login, logout, account creation, and access denied errors. - Ciba
Implements Client-Initiated Backchannel Authentication (CIBA), allowing authentication requests to be initiated on a separate device. - Consent
Displays the consent screen where users approve or deny client applications access to their data. - Device
Handles the device authorization flow, used for input-constrained devices like smart TVs. - Diagnostics
Displays the current user’s claims and session information, useful for debugging. - ExternalLogin
Manages authentication with external identity providers such as Google or Azure AD. - Grants
Allows users to view and revoke permissions they have granted to client applications. - Home\Error
Displays an error page when something goes wrong. - Redirect
Handles post-authentication redirects back to the client application. - ServerSideSessions
Provides a UI for managing server-side sessions when that feature is enabled. - Shared
Contains shared layout files, navigation, and validation components used across all pages.
Key Files:
- SecurityHeadersAttribute.cs
Adds security headers to responses to help prevent common web vulnerabilities. - Telemetry.cs
Integrates OpenTelemetry for distributed tracing and metrics.
STEP #17: Additional Configuration Options
The included user interface pages are great. They provide a solid starting point for implementing your own custom OpenID Connect identity solution.
However, I want to point out that there are several configuration files scattered throughout the Pages folder that are easy to overlook:
- \Account\Login\LoginOptions.cs
- \Account\Logout\LogoutOptions.cs
- \Ciba\ConsentOptions.cs
- \Consent\ConsentOptions.cs
- \Device\DeviceOptions.cs
It’s worth being aware of these files when customizing the user experience. In particular, LoginOptions.cs and LogoutOptions.cs are important to review early on, as they control fundamental authentication behaviors like allowing local login, enabling remember me, and handling post-logout redirects.
Frequently Asked Questions
Below are questions I did not cover in detail above, but that are important for a production-ready setup.
Do I need Data Protection for IdentityServer in production?
IdentityServer relies on ASP.NET Core Data Protection to protect cookies and protocol state. In production, persist the key ring outside the app instance. Otherwise, restarts, redeployments, or scaling out can invalidate cookies and break sign-in flows. Use a shared key store per environment and protect keys at rest.
Further reading:
- How to: Use Data Protection
- Introducing the Data Protection API Key Ring Debugger
- Persisting the ASP.NET Core Data Protection Key Ring in Azure Key Vault
UseStaticFiles vs MapStaticAssets: which one should I use?
If you target .NET 9 or later and your assets are known at build or publish time, prefer app.MapStaticAssets(). It is optimized for static web assets and provides benefits such as build-time compression and fingerprinting that UseStaticFiles does not offer.
If you serve files added at runtime (for example, user uploads) or files from other locations or providers, you still need app.UseStaticFiles(). For more details, see Static files in ASP.NET Core.
How do I run Duende IdentityServer in Docker containers?
Running IdentityServer in containers is very achievable, but you need to get a few fundamentals right. The most common pitfalls are networking and URLs, especially the difference between container-to-container communication (internal DNS names) and browser-to-container communication (hostnames and ports), as well as correct issuer and redirect URI configuration.
I cover this end-to-end in a step-by-step series here: IdentityServer in Docker Containers.
Summary
We have now created a working Duende IdentityServer implementation from scratch. Along the way, we configured Serilog for comprehensive logging, added the IdentityServer middleware, integrated the sample user interface, and set up test users and configuration. You should now have a solid foundation for understanding how all of these pieces fit together.
The next step is to create a client application and an API that relies on this IdentityServer for authentication and authorization. However, that is beyond the scope of this blog post. In the meantime, I encourage you to explore the sample UI code, experiment with the configuration in Config.cs, and review the various options files we discussed.
If you want to learn more about OpenID Connect, OAuth, or Duende IdentityServer, check out my OpenID Connect for Developers tutorial and my workshops:
Feel free to reach out if you have any questions or want to discuss how to build a robust authentication solution for your organization.
Feedback, Comments, or Found any Bugs?
Have feedback, spotted an issue, or found a typo? I’d love to hear from you! Your input helps improve the content and assists other developers who might encounter similar challenges. Get in touch!
All code for this tutorial is available on GitHub.
About the author
Hey! I’m Tore. I’m an independent consultant, trainer, and coach helping developers with authentication, authorization, and modern application security. I work with teams to build secure, scalable, and observable applications, specializing in Duende IdentityServer, OpenID Connect, and OAuth.
Interested in training, consulting, or an extra pair of hands to strengthen your web security skills or projects? Learn more about my training and consulting services.